Every photographer is faced with different challenges when they head out and return with a card full of images. But with each and every photo there are going to be some common issues that need correcting or checking prior to you investing any serious time and effort into editing the image. The good thing is that all of them can be done in Adobe Camera Raw (ACR) or Lightroom.
IMAGE SHARPNESS - THE VERY FIRST THING.
Before we do anything lets check that the image is not only focus sharp (meaning you have focused at the correct location and have the correct depth of field.) and or that the image all over is capture sharp. Quite often an image can look sharp when it is on your screen but once you zoom in to 50% you can see that maybe your tripod had some slight movement, it got bumped, or you shot on a tripod and had your image staberliser still turned on, the wind wobbled your camera the list goes on.
When checking your image for sharpness keep in mind that the edges of your image can tend to be soft and not as sharp as the rest of your image due to diffusion of the lens and the aperture that you shot the image at.
Now that we know that our image is capture and focus sharp. We can go through and check and apply a number of different house keeping things to our images. So these are in no particular order now.
1. DUST SPOTS
Dust spots are one of those things us digital photographers have to deal with, depending on the amount of times you change your camera lens, how you do it, where you do it, how clean you keep your gear will all play a factor in your sensor staying clean. But regardless because it can happen you need to check your images for any sensor dust marks and remove them using the “Spot removal tool” located in the top left header of ACR (Icon of a brush and dust particles) and in Lightroom can be found under Develop and it’s at the top under your images histogram and the icon is a Circle with a small arrow coming out of it on the right.
When clicking on either of these you have several options where you can enlarge the brush size and also the feather. The inner circle is the size of the removal tool and the outer circle is the feather of how it will taper off the removal effect. When you apply your first click you can move where the image takes the sample from. It is a case of trial and error and playing around with the tool.
Personally for me I do all my dust removal in Photoshop using the Clone Stamp tool I find I have better control over selections and it’s application.
For the spot removal tools in both Lightroom and ACR to enlarge or reduce the brush size hit the [ or ] keys on your keyboard.
2. WONKY HORIZONS
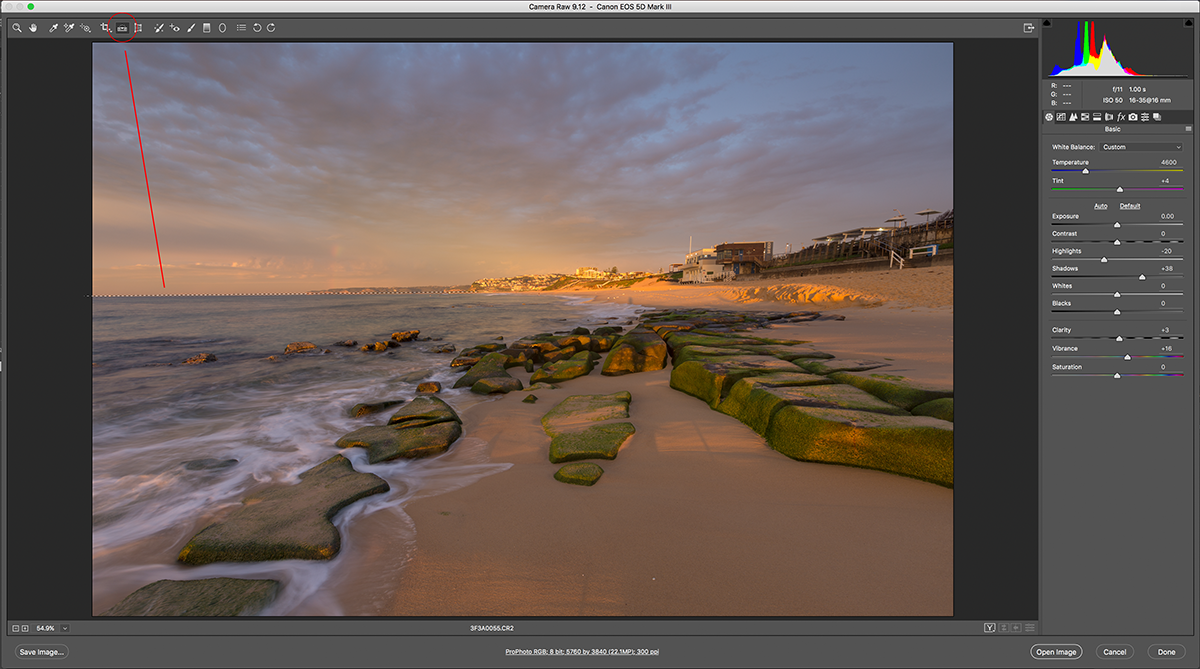
Nothing worse than having a bent horizon and overlooking it. The best place to correct the horizon is in ACR or Lightroom as it will correct the problem and also re crop your image at the same time to the aspect ratio that your image was captured in.
Select the Straighten Tool in the top left menu of Camera Raw and then click and drag it along the line of the bent horizon. You don’t need to drag it all the way across your image just the part that is bent, this will give you the best result. When you release your mouse you will see the adjustment and it will also re crop your image to the aspect ratio of capture. For a DSLR this is 3:2. Depending on how bent or off your horizon is, the greater or less the amount of cropping is. In some cases, this can ruin your image altogether and it shows the importance of shooting as straight as possible when out in the field.
3. COLOUR CAST / WHITE BALANCE
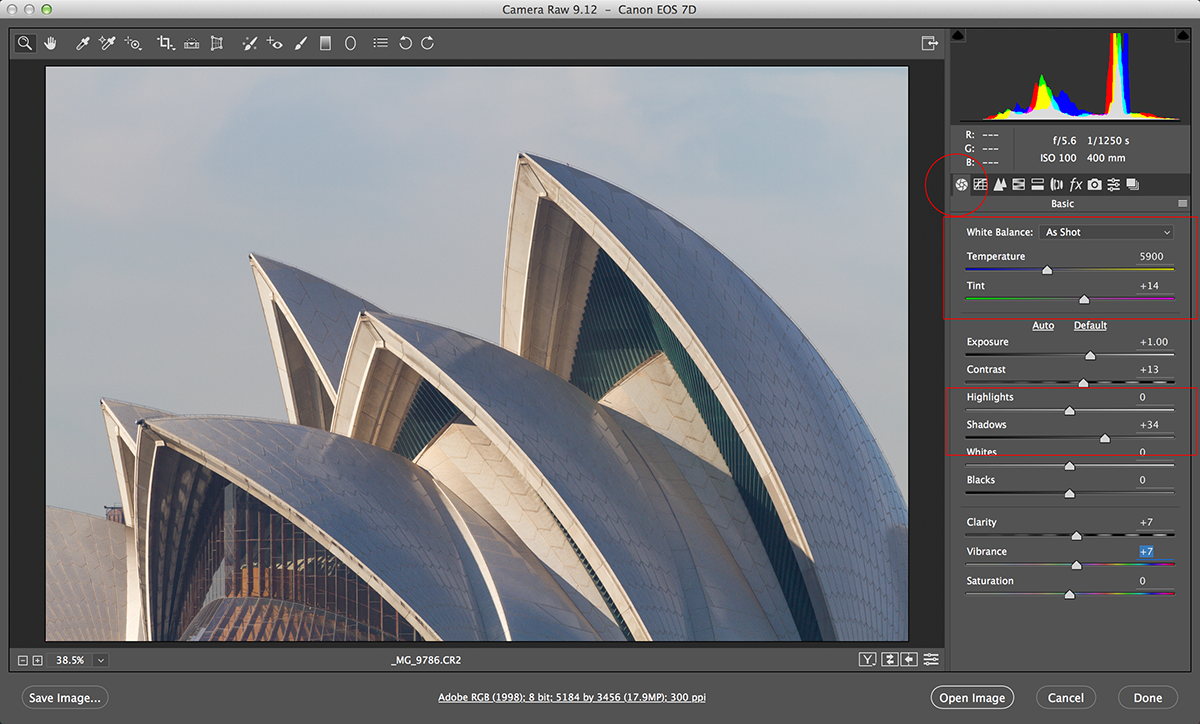
When shooting in RAW format what white balance setting you have your image at doesn’t matter as you can change it in Camera RAW or Lightroom and the change is non destructive. To keep it simple I always shoot my camera on AWB (Auto White Balance) and then I do any white balance correction in Camera RAW.
The white balance is adjusting the Blues and Oranges in your image. The other slider option is Green and Magenta, most of the time this isn’t touched but you might find that you need too from time to time.
** When adjusting the colour temperature or any other colour cast in your image it is important that your computer screen is calibrated. As if your screen is leaning towards being cool then you add warmth to your image to remove it, in truth coolness never existed and now you have edited your image to remove it.
4. SHADOWS AND HIGHLIGHTS
Working with RAW camera information is key when extracting detail for shadow areas and re capturing detail in your highlights in your images. There is no hard and fast rule to how much you apply but the thing is to make sure your image remains integrity and you dont turn the shadow areas into noisy mud.
5. REMOVE CHROMATIC ABERRATION
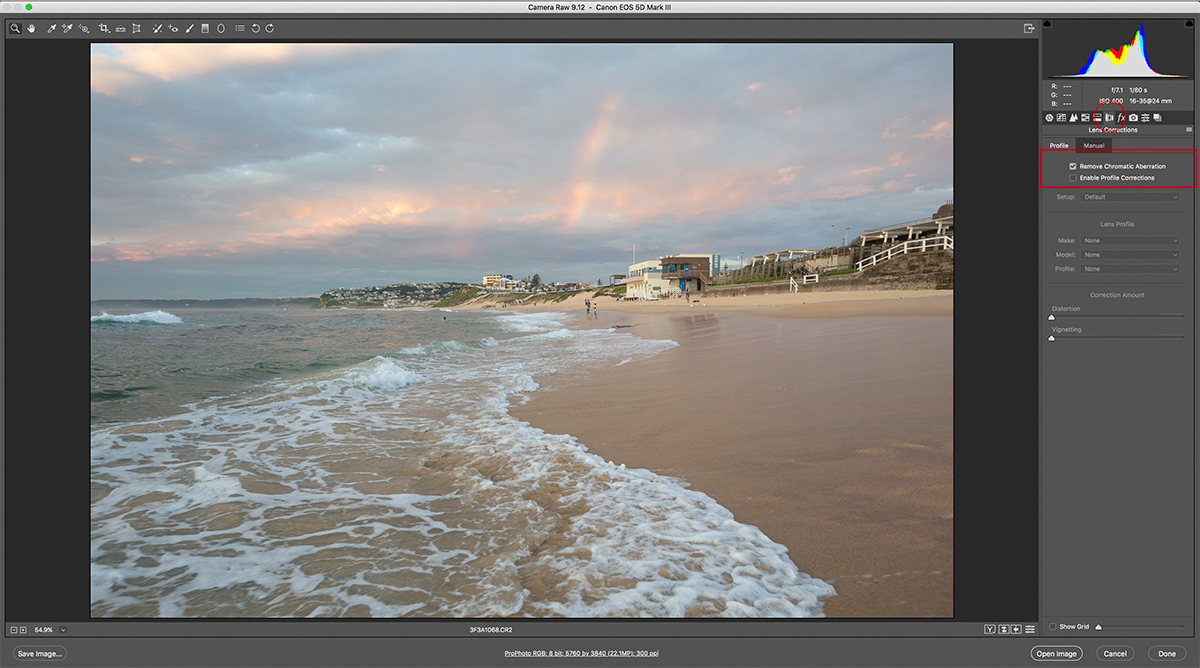
Chromatic Aberration in your image is that strange red/green colour fringing you see on the edges of your image where there is high contrast between light differences. As a landscape photographer, you will commonly see this in your sunrise or sunset images where the bright light in the sky contrasts against a coastal headland or foreground rocks (as an example). Chromatic Aberration is very easy to remove and again we do this in our RAW image processor. In Lightroom or Adobe Camera RAW you just select the Lens Corrections box and check “Remove Chromatic Aberration”.
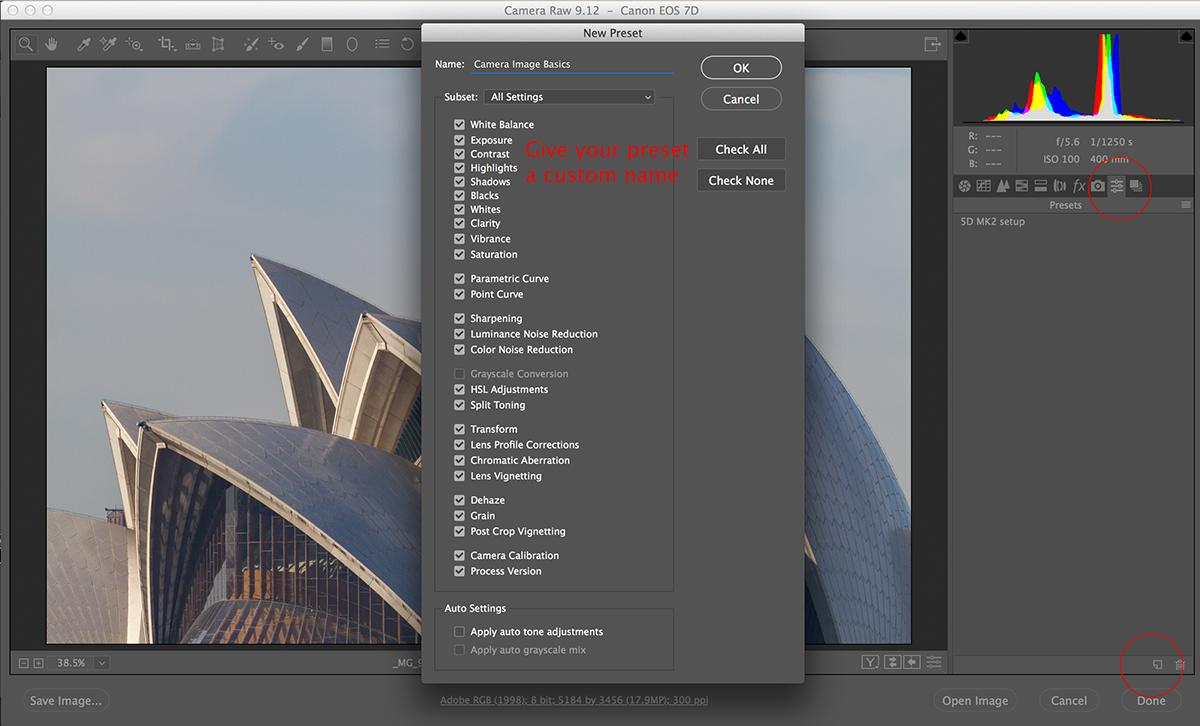
** This is something you apply to all your images so why not set this up as part of a one click action for your RAW editing.
6. APPLY PROFILE CORRECTIONS
Just like removing Chromatic Aberration applying your Profile Corrections is a one click feature. What this does is it addes lens correctional adjustments to your image based on the Camera model and the lens you are using.
In some cases you may not like the adjustment, but more often than not it will remove and barreling distortion you have in the image as a result of shooting with a wide angle lens and your horision being curved.
ESTABLISHING AN EDITING WORKFLOW
As you progress as a photographer there are things you need to do consistently to ensure you always create great images. Making sure you do all of the above will become part of your image edting workflow. What might seam to take you five or ten minutes now of playing around will be able to be done in under a minute. Photographers do this kind of check with every image, I know I do and without knowing it they have their own image pre processing workflow.
With these 6 image checks and adjustments done, your image is now ready for further more image specific adjustments in ACR / Lightroom and then moving into Photoshop.



akiqv6
zbhcol
nxvasp
hcytgc
gjlawl
6jbcew
9s8n7m
6mdntt
v40uq8
lxjye4
b1mnuo
cgew73
fjxpmn
3lhtic
5hg6s9
4ncu3p
m2ln25
um4m64
zg87k1
y49new
4nbrta
s8hbis
tv0gap
lbm4nr
pd6q0l
4jtqyw
q3nc87
cp0038
em6x76
gbfxvv
g9it0e
f6kwj1
s07mnr
c07tyb
aqy5zy
0o3ftk
qfxts8
5zjfgi
sx6m3q
4yew3g
orv7ef
fo2r3k
zmb87q
lmm885
6o33bb
h04loy
hixtbf
13nfck
md4rki
wung9k
k0k7yz
tfzlkj
r8ukub
45f6gy
ncf1wx
di01n6
o16lj2
ogdqyt
h71xha
ayadax
o6rroh
avm4y6
luzhue
6ofkus
713863
wcdkoy
gi3e2d
ls4db7
elzt6e
tcyy5o
ozu0ta
c70z1m
n5slxy
6lptjq
stmcpf
qpecio
bmfr8z
s7nmvu
5k4ln2
pw6fav
by2jbq
50c688
q4cl45
4ymotn
7k6e67
roj8pq
jyf8hi
m4p9pl
k6imi5
gkczsk
mfk8bq
6x0uwh
1c56ss
jebk3o
puldp3
ihs7v9
ujuarl
ticlkg
gnf0c2
9ir1iv
d9ibhx
0nnyyc
jel2jc
e9fh07
8863q5
q1uh4w
rpkxxt
2kd0g4
mhxsmw
324p8u
exmsy8
ihupcy
ds6mog
fructp
w9o8yy
f6x7uy
br0gkv
vytjhf
m32iuw
o3nzdl
jyvoz6
tcanxi