Exposing to the Right (ETTR) or Highlights Right, are all terms for shooting your images using your digital camera’s histogram as the guide and pushing your image to the limits of single image capture. It is an excellent way to take your photos and let you understand the tonal range of capture in all kinds of settings. The key thing to remember with shooting like this is the term Exposing to the Right can deceive the everyday photographer and this is what we will talk about in this article.
The other term “Highlights Right” is a bit more of a give away… HIGHTLIGHTS right. Not everything thing else right.
Before reading further if your new to histograms and don’t really understand what you’re look at then have a read of my article “How to Read and Understand Your Histogram“.
WHAT IS EXPOSING TO THE RIGHT (ETTR)
Exposing to the right is about perfecting your image exposure by adding in more luminance to the image either through an ISO change, Aperture change or most commonly a shutter speed change. The idea is to add in exposure so your histogram moves further right, without blowing out the images highlights. The advantages to advancing your histogram is that
The advantages to advancing your histogram right is it adds in more information into your shadow areas, so in post production you can extract even more detail out without causing a muddy pixel colourisation effect to dark areas.
COMMON MISCONCEPTIONS WHEN EXPOSING TO THE RIGHT
A lot of people who use this technique of exposing to the right think every image needs or has to be pushed to the limits of the histogram ie Just before you get highlight clipping warning (blinkies) or when you just get them. But they need to ask themselves one simple question. Does my image have highlights and does it need to be push and if so how far. ?
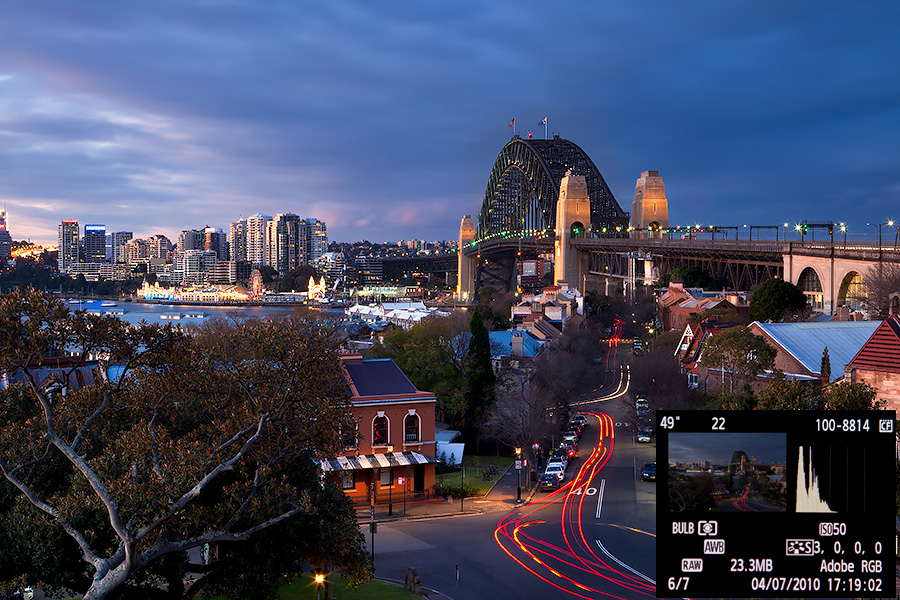
I have shot many images that don’t have highlights in them like the image above. It is a photo that was taken about 20 minutes after the sun had dropped as you can see from the histogram of the shot (bottom right) the image isn’t even close to sitting right. The reason why it wasn’t push right is simple… it has no place sitting right. It’s not to say the image couldn’t have handled another stop of exposure but as you can see from the final image it didn’t need it.
So don’t get locked in the mindset of pushing everything right… ask yourself… does my image have highlights and when I say highlights I mean bulk highlight. If yes then push it right. If the answer is no, then push it a bit but not fully right.

Three histograms examples illustrating Histogram examples of a common exposing to the right process.
CONTROLLING YOUR IMAGE FIRST
Exposing to the right on your image is only really effective if you have controlled your images highlights. When shooting sunrise or sunset it is quite common to have a histogram that is split where you have a peek for your shadows and a peek for your highlights. More often than not you will find your highlights quite close to being “Exposed to the Right”. But the problem is that the whole idea of Exposing to the Right is to add detail to your shadow area so you need to find a way to join these two together and to do this your going to need a graduated neutral density filter.
Once this is applied you will be able to see that the highlights of your histogram will now move left and you will have a much more normal looking histogram, from here you walk your histogram up to the right. By this I mean if your exposure was 1/60th of a sec add in a stop of exposure. So that’s 1/30th of a sec. You will see your histogram jump to the right. Re assess your image, does it need more, if so add more exposure. Add in another stop 1/15th of a sec (all subject to your image). Now if this is too much then back it off in 1/3rd of a stop increments until you get what you want.
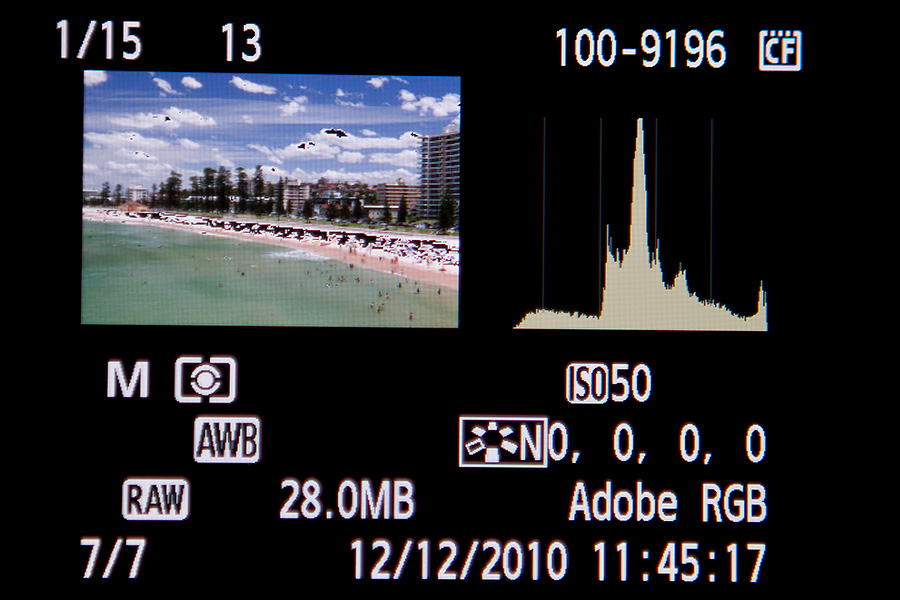
Day shot with a polariser on @ 50 iso pushed right to the point of visible clipping being just visible, file part of a digital panoramic stitch
Final stitched image. All files pushed right to the point of visible clipping.
PUSHING PAST THE CLIPPING POINT
When exposing to the right for a shot that is to be pushed to the right it is all about adding in that extra bit of exposure so the shadows have more detail and information. A setting within your camera will allow you to turn on the “clipping warning” feature or “Blinkies”. This will let you know when parts of your image have been clipped where there is a loss of information.
The thing to remember when pushing your image right is if your exposing your shot during the day and you have a shutter speed of 1/200th of a second and no clipping and then you add in another 1/3rd of a stop to 1/160th of a second and still no clipping and you add in another 1/3rd stop to 1/125th of a sec and you now just see clipping then this is your right exposure.
The reason being is that your histogram and LCD viewed image is based on a Jpeg file and through the Jpeg compression of image information loss you will find that your RAW file will still have information in these areas and not clipped at all and through RAW processing you will be able to pull these areas right back. But what you have got is that extra detail in areas of shadow.
EXPOSING TO THE RIGHT AND EXPOSURE BLENDING - THE PROGRESSION
Exposing to the Right is a single capture technique using neutral density filters when required to merge your exposure tonality and then push it right. With exposure blending the idea behind that is to capture the full dynamic range of the photo and then blend it together.
As your photography skills and editing skills advance in terms of using luminosity masks for blending your images together, the technique of ETTR will be something you will do less of and blending your images together will be the future of your photography (especially for landscape photographers). For an introduction to Exposure Blending you can read our article “The basics of Exposure Blending“.

