If you ask any photographer, photography is a two stage process. The first is the capture, getting your image correctly exposed, focused, getting the images you need for your final creation. If your going to invest your time into editing you need to have a good image to start with as if you don’t your basically polishing a turd and the image is useless other than showing on line at a small size. Now the second part is the editing of the image. Both parts are as critical as each other. The good thing about having a good photo to start with is if your photoshop skills are lacking you can always come back and re visit your photo over and over again.
Now the second part of photography is the editing of the image. Both parts the capture and the processing are as critical as each other. The good thing about having a good photo to start with is, if your photoshop skills are lacking or growing you can always go back and re edit the same image from scratch months or years later. (that’s if you shot it in RAW). I have done this many times and still do. Quite often I will go back to photos I captured back in 2008 / 2009 and re edit and explore them.
But in this article, we are going to assume you have a photo that’s worth your time editing. The best place to start with your image editing is having a post production plan, a workflow, a set process that you follow each time when you start to edit your images. Once you have the foundation of editing done the next stages are enhancing and tweaking your image to get it polished for final use ie online / print. The benchmark for all your editing though is printing quality, not online for facebook or your website.
THE MYTH OF PHOTOSHOP EDITING
This could be a whole article on its own and probably will be. But before you even touch your image understand one thing, photoshop editing is a totally natural image editing process. It is no different to taking your roll of film to the lab to be processed into prints. In today’s day and age film is gone for most of you and it is replaced with digital files so now your the processor of your photos and photoshop is your film lab. When I see someone brag online “I didn’t even touch this image in photoshop” my thought is “You can tell”.
Another important point is when you look at some ones image being edited, you look at the layers pallet and see a list of like 25 or more different adjustments to their image and your going to think “wow they have photoshopped the hell out of that” but that’s totally wrong what they have is a sensible approached to editing and everything they do to an area on their image is done as a new layer. Which allows them to make changes or delete something that didn’t work that took 2 minutes to do, instead of doing everything or 5 things on one layer and then deleting that and wasting 10 minutes. More layers the better ok.
THREE THINGS ALL PHOTOS NEED
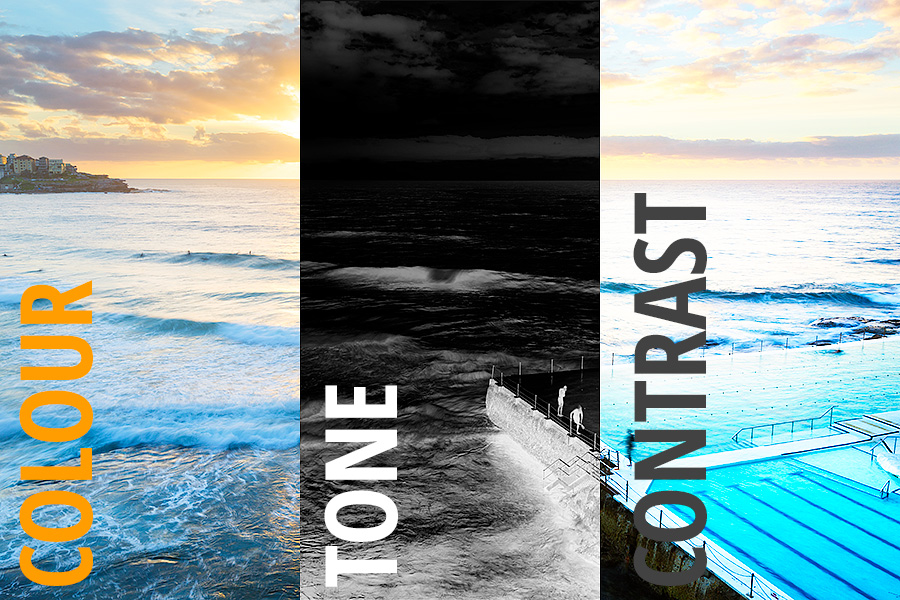
Your RAW image is exactly that a RAW capture. When you open your image for the first time you can easily become disheartened with how it might look. Flat, Colourless, no Mood or feeling, but fear not everything is right there to be massaged out in photoshop ie processed. All images need three main things edited:
Colour, Tone and Contrast, but it has to be in the right order. The right order is Tone, Contrast and Colour. The idea behind this will soon become apparent and explained.
ADDING TONAL RANGE TO YOUR IMAGES
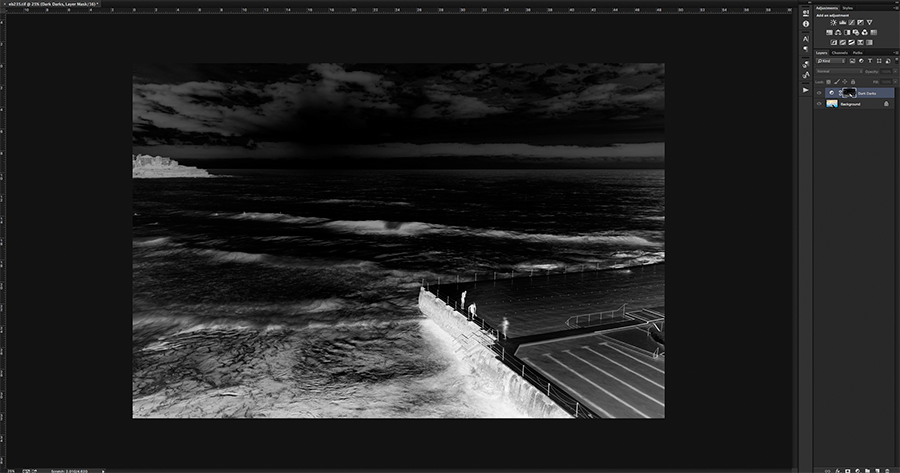
When I say tone or tonal range to your image I am talking about the detail you see in the image in your highlights and shadow areas. If you were exposure blending your images then this is the first thing you would be doing, editing each image to get the most out of it and then blend it all together for your next two steps (Contrast and Colour), so if you have a single image then this is no different, tonal range first. The reason why we do tonal range first on a single image is when you start adding contrast to your image in the next stage it can darken or brighten the image subject to how much you apply and where you are applying it, so it is always best to work on the tonal range of your image first for this reason as your playing pixel information in your image that is real at the time of capture.
The best way to target your tonal range of your image is to not do global adjustments (ie edit the whole image) but to isolate the areas that need work and the best way to do this is by creating masks that target areas of your image that have different ranges of darkness and highlights. Tony Kuyper a US landscape photographer has created a range of pretty much essential photoshop actions that make this process a breeze where the actions will assess your image and create a curve adjustment layer with a detailed mask attached based on your images Super Dark, Shadow Dark, Dark Dark and Dark areas and will then do the reverse for highlights, Super Lights, Bright Lights, Light Lights and Lights. The action will also create masks to target your mid tones as well. (You can find a link to these actions at the bottom of the article).
What you decide to target and how you go about it is subject to your image and what it looks like. Just remember don’t be afraid to have lots of layers.
ADDING CONTRAST TO YOUR IMAGES
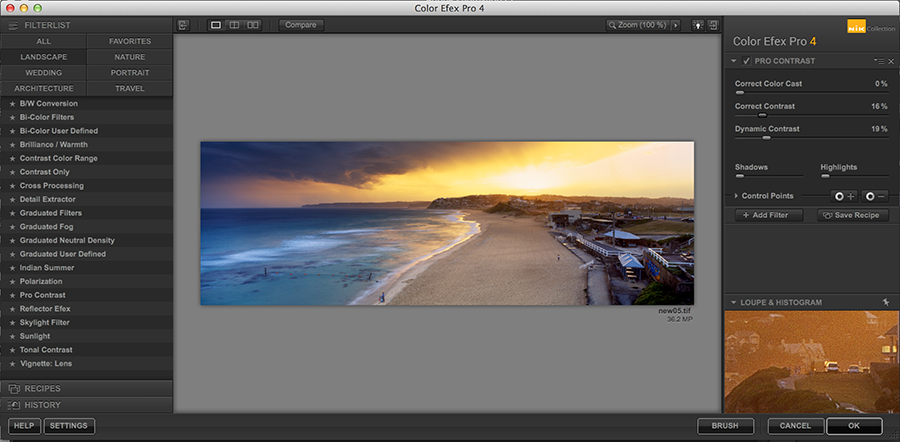
Now that we have our tonal range done (when I say done I mean mostly done, we are setting up our initial post production workflow up here) next is adding contrast to your image. For this is it is easy to grab the curve adjustment layer and start adding it in, but before you get to that I always start with the free Google Nik Filters you should download and install the whole package to photoshop. In this filter kit to add contrast to your image you can’t go past Color Efex Pro. In this application it will open in Photoshop and your going to want to select the “Pro Contrast” feature. You will have three sliders to select Correct Colour Cast, Correct Contrast and Dynamic Contrast.
Of these three options Dynamic Contrast is going to be your big player in adding that Pop to your image. But play around with the sliders and see what you like. Keep in mind that your editing the image globally so if there is an adjustment where it looks great in one spot and too much in another you can always mask in and out what you do and dont want as when your finished it will add the image to your layers pallet and you can add in a black mask and then reveal what you do and don’t want.
** As you add in the contrast keep an eye on your colour you will see it increase and intensify as you apply contrast to the image, this is why adding colour to your image is the last stage
From here I will then apply contrast to various areas of the image using the Curve adjustment layer and masking the areas in and out as needed.
ADDING COLOUR TO YOUR IMAGE
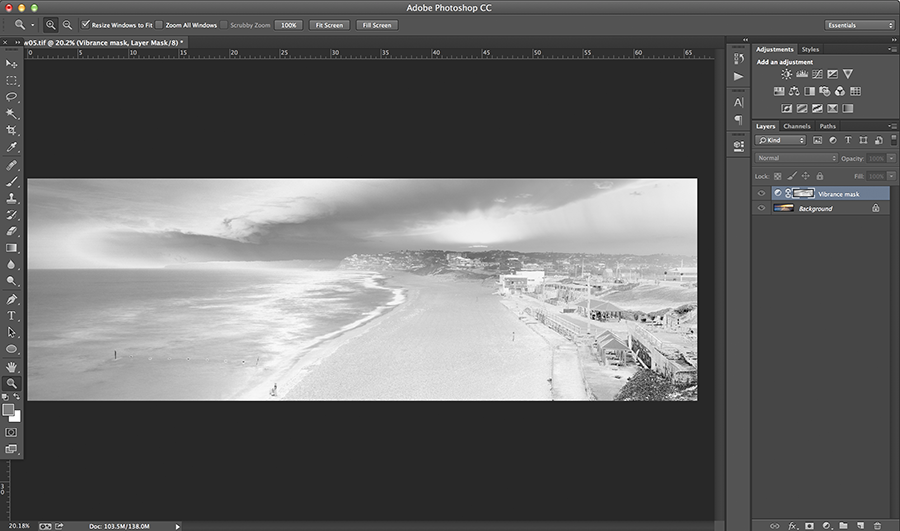
With our tonal range set and contrast added you might find that your adjustment to colour is not as drastic if you did as your first process. Now there are many ways to add and adjust colour to your image. But firstly we want to do a global adjustment to our colour and for this we are going to look to the Tony Kuyper action set and select Vibrance Mask. The Vibrance mask will make a very complicated mask that will accompany the Saturation Adjustment Layer as it will create a mask that is based on colours that arn’t already colour saturated ie flat colour.
Once this mask is created use the master slider to apply colour to your image to the point where it is enough. Then go into each colour channel and do more selective adjustments. Remember you can create the Vibrance mask over and over again and select areas and mask out the rest. You will find that this Vibrance mask will do all the hard work on your image. Colour adjustments from here look at the Selective Colour adjustment layer and tweak your colour areas like Red, Blue, Yellow and White. In this area I mostly use the Black and Cyan sliders in each colour area.
TONY KUYPER V5 ACTIONS PANEL
The Tony Kuyper actions I mentioned can be found on this website. Look for the V5 panel which will give you everything. But if you just want to have a great starting point then download the free Luminosity Masks action set.
WRAPPING IT UP
If you have followed this process you should see a massive difference in your image from where you first started. Just remember that the above is a workflow that I encourage you to follow every single time you sit down to start editing. Once you have gone through the Tone, Contrast and Colour start then you have set the foundation for your Photoshop Mastery of tweaking and playing around with your images, doing real selective adjustments and enhancing. How much you do your don’t do is totally up to you and the image you have in front of you. Everyone has their own style of images they want to achieve but at the end of the day as long as you are happy with what you have created and big bonus points if you have made sure your editing is done so your image looks great for being print large and not just facebook.
If you have any questions about the above information then feel free to ask, or even share your own workflow with things you do and why.

