You know every single photographer out there has at some in their career gone “What does Aperture mean” and the reason why is because we were all beginners. I remember hand holding my new film camera taking 1 second exposures and asking a mate at the time who was helping me understand the basics “Recon that will be good” and he was like “No dude” and laughed. Now sitting here as a professional photographer I thought I would list out some common mistakes I have seen photographers make over my career as someone active in the field shooting and also teaching photographers as well, so I hope it helps.
I have broken it into two sections. Core problems which I think are essential to helping you be a better photographer, then problems to keep in mind that will help you but aren’t essential.
1. SHOOTING JPEG AND NOT RAW
This is an absolute must if your shooting images that you want to be able to develop and process into a better photo. A Jpeg file is one that has already been processed to some degree in your camera, colour, tone and resolution has been deleted to some degree and the image is then saved to your card. A RAW file is your master capture. Nothing is deleted or added to the photo and it is the full resolution capture capability of the camera. If your worried about card space then get a bigger card. As a beginner just shoot on the RAW setting, if you really need a Jpeg file quick then shoot RAW + Jpeg.
2. SHOOTING TRIPOD MOUNTED IMAGES WITH IMAGE STABERLISER ON
The image stabiliser feature on your lenses is there to compensate in slower shutters speeds the movement of the lens to counter act it so the image is as sharp as possible. When you camera is mounted to a tripod and this feature is on is can cause your image to have blur. I remember I was teaching a course and we were shooting sunset and a students images just weren’t sharp for some reason when we viewed them on the screen and zoomed in. As soon as we turned the IS off on their lens, perfectly sharp photos.
3. SHOOTING WITH YOUR LENS STILL ON AUTO FOCUS
When shooting landscapes it is all about making sure your foreground and background are sharp. To achieve this you need to focus your lens at the correct distance in front of you so from your point of focus to you is sharp and everything behind it. This is called your Depth of Field. A great calculator for this found on a website called dofmaster.
The process is you focus your camera 1/3rd into your scene (or as recommended) on auto focus and then switch your camera to manual and then shoot. If you don’t change your focus to manual and shoot then your point of focus is now not 1/3rd into your scene (which would be 5 meters away) it is now possibly on the horizon some 2km away. So make sure you don’t shoot landscapes with Auto Focus on already remember to focus your lens as required and then switch it to manual.
** Little pro tip here in your camera you can switch a setting to show you the focus point used on the capture. If your on Auto Focus it will show you, if you shot the lens in manual you won’t see it. So if you see the red square /s then you know your capture workflow just broke and you need to re focus your lens.
4. NOT UNDERSTANDING YOUR HISTOGRAM
When you take a photo everyone looks at the screen and bases there reference if the image looks good or correctly exposed on what they see. The screen on your camera can be very deceiving to tell you if your photo is correctly exposed especially for beginners. If your screen has been set to bright your image will be off, if your looking at your screen in harsh light the true quality of your image will not be known until you look at it in better light. The real truth to your images capture is the histogram. The histogram maps out your images tonal range I could go into great detail here about I have an article out soon called “What is your Histogram and how to read it”.
5. SHOOTING AT AN ISO THATS TOO HIGH
The down side to many and any digital camera is it’s ISO ability, every photographer wants better high ISO ability out of their cameras. I know that’s what I look for when it comes to buying a new camera. But the thing is knowing what ISO to use for the right time and how far you can push your ISO before you loose quality is essential. A lot of times beginners will increase their ISO too high thus giving them selves an image that will suffer from high ISO noise.
Like for example if your hand hold shooting a landscape scene you can do this easily with an ISO of 100 and a shutter speed of 1/200th of a second, to play it safe go 200 iso and 1/400th of a second. There is no need to shoot it at 800 iso and a shutter speed of 1/1600th of a second. For more details on ISO and how to use it you can read our article on it.
6. NOT HAVING AN IMAGE / FILE BACKUP SYSTEM
A side from your camera gear the files you capture can soon become far more valuable than your camera gear. For me I can’t put a price on what my images are worth or what I would do if they were suddenly lost that’s why I have multiple back up systems in effect.
My first line of image saving is using a Drobo Storage System where the files are stored on a hard drive that is backed up by another hard drive within the unit. Then if a hard drive dies you replace it and the system will re back itself up and nothing is lost.
My second line is having an external hard drive that is a mirrored copy of what sits on the Drobo. I use a program called GoodSync that will keep it updated. When you add new images to the Drobo and then attach your external hard drive one will check the other and then update accordingly.
Now aside from the RAW files I have from shoots, from them I create master print files that are used when I add images to my website for sale. These are the real precious images to me. These files live in their own folder on my Drobo along with the external hard drive. They also live on another two separate hard drives marked Working One and Working Two. One I keep pretty much on me or around me at all times and the other I have located at an address that is not my personal one or my work. This is in case my house burns to the ground or some grub breaks into the house and steals it.
The main thing is having your images sitting in at least two location’s not on the same device. Have one on your computer hard drive and on an external hard drive as the minimum.
A few years ago a landscape photographer I know had his house broken into and they stole all his hard drives and he lost everything, year and years of work, he had some great stuff. If he had an external back up copy then it would have been recoverable. Even if that copy wasn’t backed up with new images for a month or two it’s better than loosing everything.

7. USING FREE IMAGE EDITING SOFTWARE
It’s time to get serious, there is only one editing platform out there and that is Photoshop or Lightroom if you must. Gone are the days where you use to buy Photoshop for $1000, you can get it for $12 AUD or $9 US a month on a subscription and then you get all the updates immediately and using the latest software. Photoshop is the benchmark for all image editing, the free resources online on using it are extensive. I could mention Photoshop Elements but why bother at those prices and also what I find with Photoshop Elements is that if you are going to learn an editing platform just use Photoshop. Photoshop Elements is fine but it has limitations or the work arounds you need to do to get it to do kind of what Photoshop will do perfectly with a few clicks really makes Photoshop the clear and only winner.
There are a lot of good programs out there that do help you with your images like Panoramic Stitching software PtGui, but all these programs will complement and feed into Photoshop for the final editing.
8. FIND AN ONLINE MENTOR / INSPIRATION
When I first started out with my panoramic camera local Australian landscape photographer Ken Duncan was a great source of inspiration. He had plenty of photos that were local to me and I could pretty much stand in the same spot as him and see how he saw a location and for me I could take the same composition as him. Then there were other photographers like Christian Fletcher in WA who’s work showed me to take risks with not just shooting the easy simple photo. Stand back from the beach and shoot interesting compositions with foregrounds I didn’t even think of in the early stages of being a photographer.
What is a great idea for beginners is to find a local photographer in your area who’s work you can look up to and can emulate. They need to have a standard of image capture, composition and editing quality that you are wanting to achieve.
9. USING A TRIPOD THAT CANT TAKE YOUR CAMERA
This is a pet hate of mine seeing photographers with a camera worth $800 + on a $40 tripod. As a landscape photographer your tripod is an essential and key part of your equipment and it is a place where you should have invested a reasonable amount of money. The Manfrotto 055XPRO3 Aluminium Tripod with 3-Section Tripod & XPRO3W X-PRO 3-Way Head Kit is what I have purchased several times over the years and I have two of them. I have used Manfrotto my whole career and they are a well made product, but anything similar to this will serve you well.
If you have a tripod that when you mount your camera to it, it creeks or your camera starts to drop down due to the weight put it in the bin right now.
10. BAD COMPOSITION / FEATURES
You can teach anyone how to take a photo, but the hardest thing to teach them is what makes a good photo. So many photos out there with amazing light that suffer from bad composition. Most of the time it is the little things like the camera being angled up or down too high, the focal length is too long or wide for the scene, scenes with no feature, boring clear sunrise skies, cutting a scene off early like a headland with a small amount of ocean, half of lamp posts left in, rubbish bins the list is endless on things that can make or add to a bad composition.
11. BEING ABLE TO TAKE CRITICISM
If you ask for someones opinion on your work the least you can do is accept what they have to say. If you want smoke blown up your backside then ask for feedback from your family or loved one. But if you ask the outside photography community then take what people say like a man, at the end of the day it is their opinion on your image and it will make you a better photographer if the feedback is good or especially if it is bad.
If your going to ask for feedback, ask for honest feedback as there is the other side of the coin where people will say that a crap photo is awesome when it isn’t and your not going to grow as a photographer. People will slam your work, but there will also be those who will give you good honest feedback in a productive way. For me when someone would be critical of my work the first thing I would do is look at their own portfolio to see where their standard was. If their work was poor then obviously if they can’t even put their own advice into practice it’s probably not worth putting much weight into it. But if that person had a good portfolio then what they had to say carried much more weight. You will find that the person with a good portfolio of images giving you a critique will be worded very differently to the person who doesn’t have a good one. lol.
But if you find someones work to look up to / emulate and you look at your own work you should be able to self critique if your honest with yourself.
" A crap or bad photo is only bad, when you think it is great, learn the difference "
12. NO BACK UP BATTERY OR MEMORY CARD
At the very least you should have one spare battery and memory card for your camera. The memory card should be the same or greater size than what’s already in your camera. Also make sure that your batteries are charged and that your memory cards are not full and have been dumped and formatted.
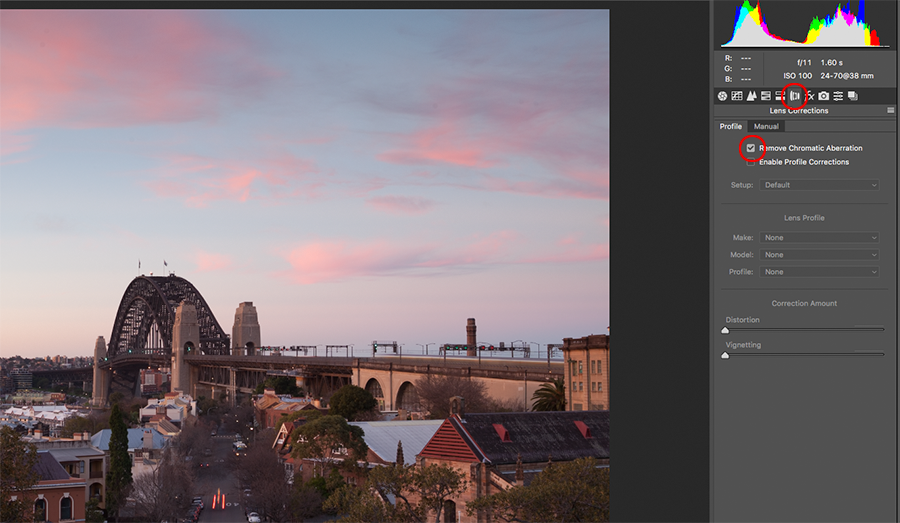
13. NOT REMOVING CHROMATIC ABERRATION IN POST PRODUCTION
Chromatic aberration (or fringing) for us landscape photographers will usually rear it’s ugly green and red head in your shots that have high contrast edges like when the bright light is hitting an area of shadow. This fault is easily corrected as part of your RAW file workflow in Camera RAW or Lightroom by selecting the Lens Correction setting and checking the “Remove Chromatic Aberration” box. It’s that easy.
If you don’t remove this then all your post production work on contrast and colour will just make it more evident.
14. SHOOTING IN AUTO OR PROGRAM MODE (P)
Your DSLR should only be shot in Auto or Program mode when you just want the shot and don’t care about all the other factors that go into image creation. Auto and Program mode will get the job done but you have no control really over the capture the camera selects everything for you. It will select the ISO, the Aperture and also the shutter speed based on the available light. Keep these modes for your holiday snaps or party shots.
As a beginner learning you need to be shooting in either AV mode (aperture priority) where you control the aperture and or ultimately shooting in Manual using AV mode to assist you to get the shutter speed you want at your chosen aperture to dial it into manual.
15. KEEP YOUR HORIZON LEVEL
The worst thing about a horizon that isn’t level is when you have shot the image you have invested time into getting the composition correct. Now when you get into your image editing software and go to straighten that horizon you will find that in order to straighten the horizon and then crop your image back into it’s capture ratio of 3:2 you will now have a totally different composition subject to the amount of correction you needed to do. You will also be throwing away pixels as well.
A lot of cameras have a built in level and if yours dosen’t then you can buy an inexpensive Hot Shoe Bubble Spirit Level like this one. Works a treat.
16. GET TO THE BOTTOM OF A BAD PHOTO
This is a great tip… if you return from a shoot and look at your images and find that none of them or very few of them are keepers and you don’t know why, then you find out exactly why that shoot was not a success. Look at your capture settings, check your camera for things like if you shot in AV mode that your exposure compensation wasn’t a factor, check your LCD screen brightness if you used only that as a reference and not your histogram. If your images are blurry what shutter speed did you use, did you use a tripod. You need and must find out why your images are bad. This is the only way your going to learn. Everyone has taken bad photos and everyone has taken bad photos when they ment to take good ones. Even now I can return with a series of images that are not useable and you can be sure I will find out why as I don’t want to waste my time and good light taking bad photos.
17. EDIT YOUR IMAGES FOR PRINT NOT ONLINE
It is easy to hide poor camera skills and image editing in a small web sized file uploaded to facebook. Sure if the light and composition is right you will get all the likes and shares but what happens if one of those people as for a printed copy of the image. There is nowhere to hide when you print your file a half decent size and if that person paying for your images dosen’t like what they see, then your just printing for refunds and that is not where you want to be. So do the right thing from the start and set your image capture and editing at the bench mark of it being printed not online presentation.
If your image isn’t sharp then don’t use it. If you can only mask a sky in well enough so you can’t see it on a small web image for facebook but you could on a bigger file or print then keep at it until you get it right.
18. OVER POST PRODUCTION
Every photographer will have their own look and feel to their images but there comes a time when you can look at an image and think “Wow that is really worked and over done” this benchmark might be fine for some but not others. Just keep in mind that sometimes less is more. If you want your work to look really polished and professional but to also look natural as well then your going to have to watch over processing your images where skies and colours don’t look natural.
This is where using lots of layers in photoshop works wonders as you can go back and find where you went too far and start again from there, without deleting everything. A good tip is before you upload anything anywhere, leave that image and come back to it in a few hours or the next day and look at it with fresh eyes and you might see that you have gone too far or not far enough.
19. UNDERSTANDING SINGLE CAPTURE LIMITATIONS
As a beginner you will see so many images on line that no matter how hard you try you will never ever be able to take a single photo of that scene. That’s because that photo you admire could be made up of numerous photos that have been blended, not just in exposure but possibly focus blended as well and then it has been warped to change the perspective. So when you look at images keep an open mind and really analyse what you are seeing and break the image apart. Reverse engineer what you think went into making that image.
There are so many techniques out there. Exposure Blending, Shutter Blending, Polarisation Blending, Focus Blending, Perspective Blending and Warping. Some images will have all of them and the skill and pre visualisation that has gone into that creation is amazing. So keep an open mind when looking at images and understand your limitation of capture and think outside of the box.
20. BUYING UNNECESSARY CAMERA EQUIPMENT
As a landscape photographer there are lots of gimick things you can get sold especially in the world of filters. Here is what you need aside from a Camera, Lens and Memory card to do high quality landscape photography.
Sturdy tripod, Remote shutter release, Polariser, Neutral Density Filters (1, 2, and 3 stop soft graduated) and a good camera bag. That’s it. No UV protection filters unless you think anything is going to damage the front of your lens with a filter kit attached to it ?? If your someone who is going to be exposure blending your images then you wont need the Neutral Density Filters, but keep the polariser.
That’s all you need.

