Adding colour to your image is a critical phase of your post production workflow. But like any of the stages of editing the application of colour needs to be done correctly. Already you have used the incredible power of luminosity masks to edit and even blend your exposures together. So why not use the power of masks to identify areas within your photo that need colour more than others and apply that colour or even rescue the colour from over saturated areas.
When you edit your image in Camera RAW or Lighroom you would have already seen on the first panel or option to add Vibrancy and or Saturation to your image prior to moving into Photoshop. So in this article through using the Photoshop “Optional MultiPlugin” plugin that you will need to install we can create these masks using the HSB/HSL (Hue Saturation Brightness / Hue Saturation Luminance) filter.
At the end of this article you will be able to create your own saturation and vibrancy masks as a channel and then apply either channel to a Hue / Saturation layer mask depending on what you want to target.
If you would like further reading on developing a strong photoshop post production workflow you can read this article.
WHAT DOES EACH MASK DO
As mentioned the use of these masks is to identify areas in your image that have various ranges and depths of colour saturation.
The saturation mask will create a mask that focus on areas that already have a high amount of saturation. For me as a photographer you want to be careful with adding in more colour to an area that already has high or over saturation. So a good use of this mask is when created you can use the Hue / Saturation adjustment layer to de saturate your image in these areas. Some people can call this mask a Rescue mask as you rescuing the colour from your image being over saturated.
The vibrancy mask is the opposite. It is an inverted mask of the saturation one. So it is identifying areas of little saturation, or where colour is at it’s weakest. So when you start adding in colour using the Hue / Saturation adjustment layer you will see what might be a flat low colour image come to life. This is the mask you will use most of the time.
INSTALLING THE OPTIONAL MULTIPLUGIN
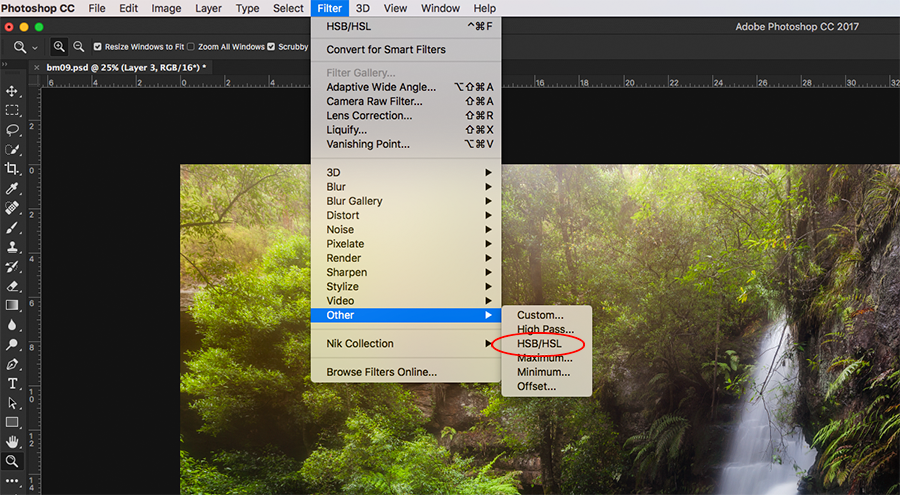
As mentioned above in order to create these masks you need to install the Optional Multiplugin for your version and operating system of Photoshop. This plugin is made by Adobe but it just dosent come pre installed with the program.
If you need help locating your plug in folder after the download this link on the Adobe website will help you.
Once installed you may need to close and re open photoshop. To check that it is installed go to Filter > Other and you should see HSB/HSL
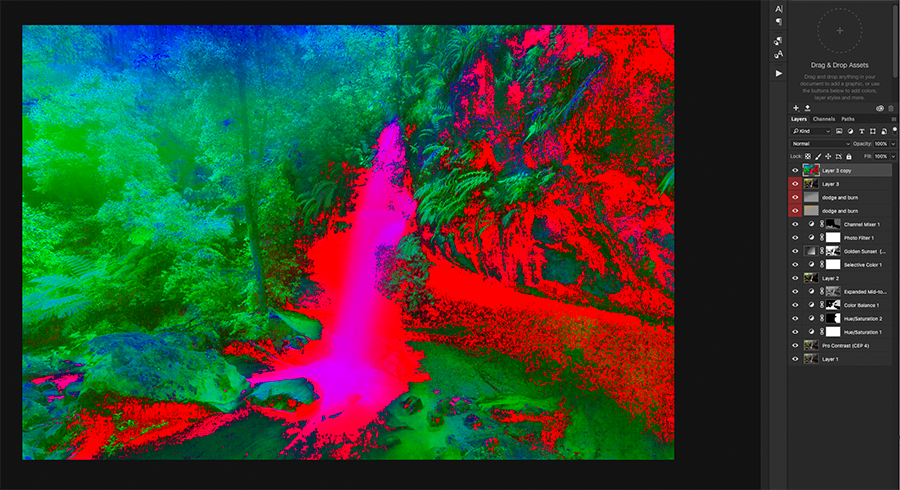
STEP 1: ACTIVATING THE HSB/HSL FILTER ON YOUR IMAGE LAYER
Ok with the plug in installed what we are going to do is make the Saturation mask. The best time to make this filter is when you are ready to apply colour to your image as the mask is going to be made on the top layer that is selected. So if you have an Adjustment layer your going to need to merge all your layers. To do this hold down the Command Key, Alt, Shift and hit the “E” key (For PC instead of the Command key hold down the Control) you will see a new layer created above everything.
Ok now go to Filter > Other and select HSB/HSL. The input mode needs to be on RGB and the Row Order HSB (Hue Saturation Brightness). Then click ok. Your image will look very odd.
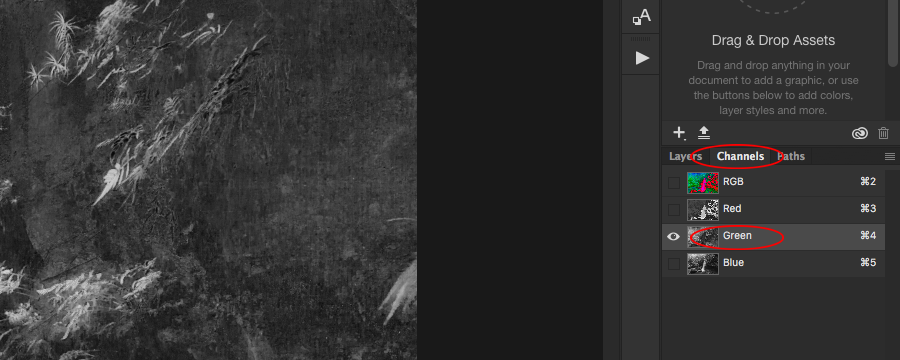
STEP 2: SELECTING THE CHANNEL AND ACTIVATING THE GREEN
Now in your layers pallet click on the “Channels” tab and you will see the options RGB (Red, Green and Blue) their all your channels together that make up your image. Then you will see the three channels separately. Now click on the “Green” channel and you will see your image turn into a Greyscale image.
This green channel is our Saturation mask. But we now need to make it as it’s own Channel.
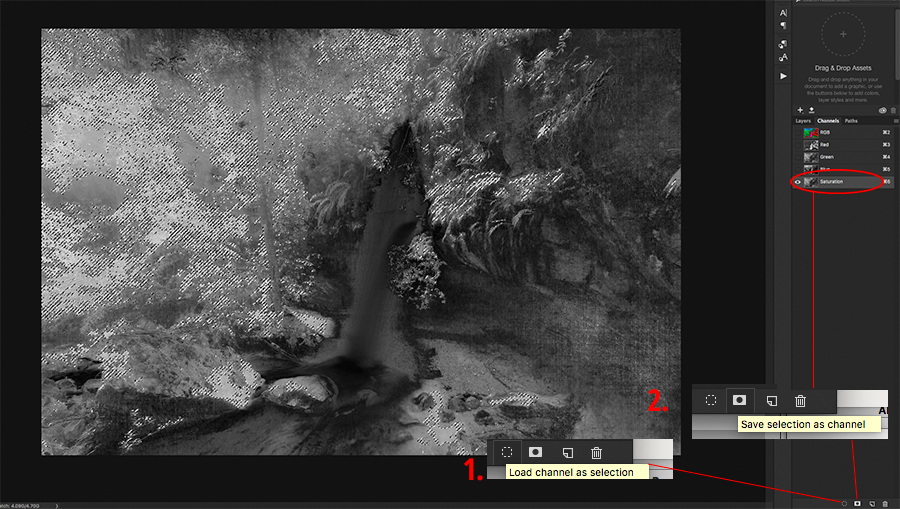
STEP 3: LOAD THE CHANNEL / THEN SAVE THE CHANNEL
With the green channel selected at the bottom of the layers pallet you will see on the left a dotted circle when you hover over it, it will say “Load Channel as Selection” when you click on this you will see the main image activate the mask, commonly known as “Marching Ants”. With this done you now need to create your own mask and this is done by clicking the icon to the right that is a box with a circle in it. When you hover over it, it will say “Save selection as Channel” Note if you haven’t done the first set it will not be available as a selection.
With this done you will see a new layer under titled Alpha 1. You can double click on this and re name it “Saturation”.
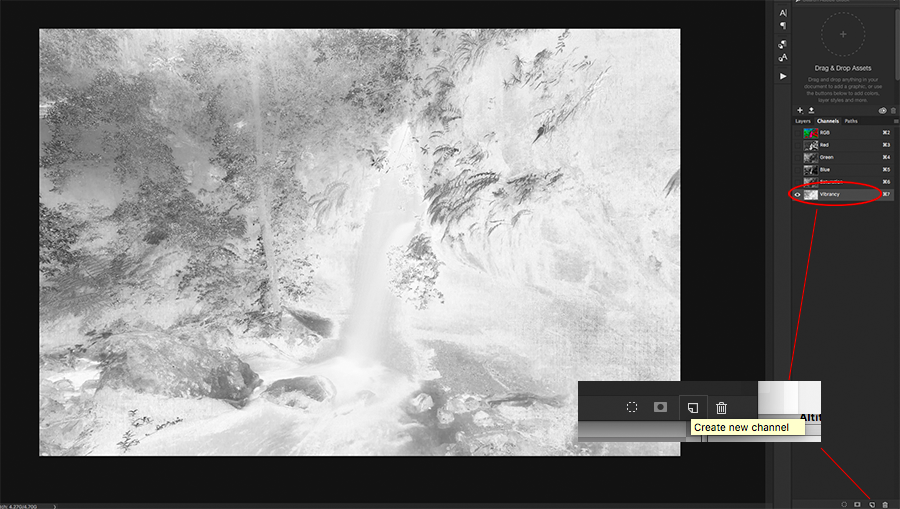
STEP 4: MAKING THE VIBRANCY MASK
Now the vibrancy mask is the opposite of the saturation mask so creating this is easy as we have already done the hard work. Click on the channel you just titled Saturation and drag it to the bottom of the layers pallet to the “Create new channel” icon (looks like a page with a folded end) and release. You will see a new layer created called “Saturation Copy” double click this and call it Vibrancy.
Now with this vibrancy layer selected hold down the Alt key and hit ” I ” to invert the layer and there you have it your Vibrancy mask.
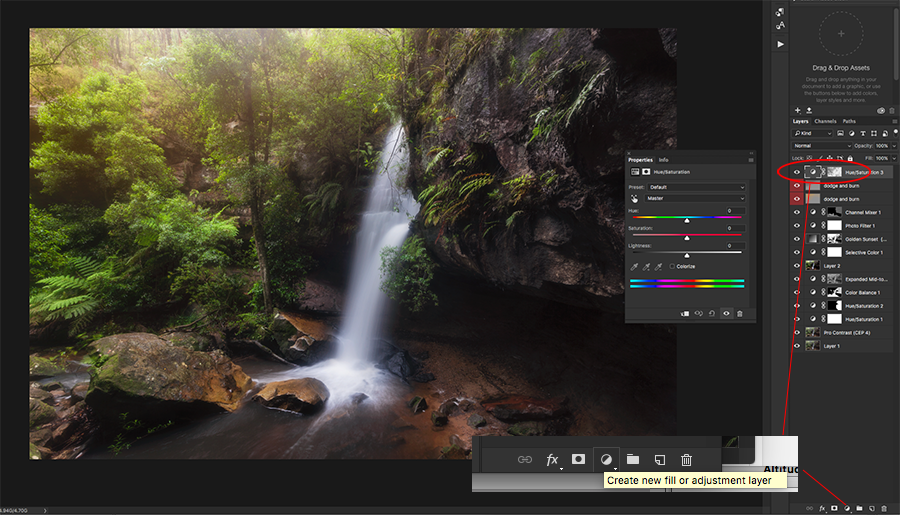
STEP 5: USING YOUR MASKS
Before we use any of these masks go in and delete the funny coloured layer that is sitting in your Layers Pallet, it is no longer needed. When you delete these your image should now look normal. If you see any funny kind of casts to your image you might find in your channels pallet you have something other than the RGB, Red, Green and Blue channels selected.
With your mask sitting in your channels you can now load them for use. To do this you go into the Channels pallet and click on the mask you want to use. Let select the Vibrancy layer as I find this is the mask that I use 90% of the time. With this selected your image will turn to a gret scale image, now go down and click the dotted circle to load the selection as a channel. You will see the Marching Ants.
Now click on the RGB layer at the top (this will turn on all other three layers below) you will see a red cast this is because the Vibrancy layer is still active, click it to turn it off.
Now move to your Layers Pallet and click on the “Create new fill or adjustment layer” it is the icon that is a circle that is half dark. Select Hue/Saturation and when you click on this it will automatically load in the Vibrancy mask that you selected and you will be able to see the mask to the site of this layer.
To view the mask hold down the Alt key and click on it. That’s it. Now play around with the master slider for this layer or go in and select the colours within it for more selective adjustment.
To load the Saturation mask you do exactly the same process you just select the Saturation Mask.
MAKE LIFE EASY FOR YOURSELF
Making these masks is pretty easy but doing this process over and over again can be tedious, so I would recommend making the Channels as a Photoshop action so you can click on the action at any time and create yourself these masks and then load them in as the adjustment layer of your choice.
Or you can download these masks and a whole lot more from Tony Kuyper who has an excellent action panel in photoshop with will allow you to load these actions in at any stage of your image editing process. His action set also includes an extensive range of luminosity masks as well. Tony’s action set comes with full instructions and also videos on installing the actions and using them. Personally as much as it is great making the masks yourself and also knowing how to make them, this is the best way to do it.

