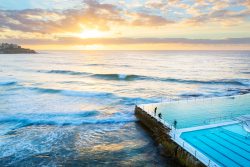
This HDR shooting and blending technique / process and me are far from friends. But this week I have told myself that I was going to give it a go. So I headed out to one of my favourite places at the moment on the Central Coast (Spoon Bay) and kicked things off.
After a nice sunrise I headed home and played with a set of images in Photomatix and after getting annoyed at the results I ended things for the day hitting Command Q on the mac thus killing the terrible image before me and terminating the program. I then decided to take a different approach and blend the three images in Photoshop. The images are -1, 0 and +1 in exposure.
So the shot on the right is my first attempt at exposure blending. I know the composition is lacking but this is just a set of shots I pulled off the card to have a go. So be kind.
CLICK IMAGE FOR LARGER VIEW
Got a few more to play with and will post once they are done.
Cheers



Matt I know what you mean! I too find the tone mapping in Photomatix leads to very ugly overdone results, whereas the exposure blending in Photomatix 3.0 can be alright. But I find that manually blending the images in Photoshop leads to the most natural looking results.
I would recommend shooting at at least -2, 0 and +2 or -3, 0 and +3 if you have the sun in the photo. You really want to try and get a middle exposure, and a highly overexposed version and a seriously underexposed version to really get some details with no noise in both highlights and shadows. Also a good test scene is find a scene like in a gorge where you have half of it bathed in sunlight and the other half in deep shadows.
Thanks Flemming. I have a few shots that are +2 and -2 and will have a crack at them later. I know what you mean with a highly over exposure shot as this reduced noise in the HDR process as there are details in the low lights.
I know a place where I can shoot the dramatic different in light.
I’m determined to conquer this process and I have spoken to a few people and they use the HDR image as their base shot for detail in shadow areas and then basically do what I have done in this shot for the rest.
matt,
its true what these people are saying about HDR as the base image….. give it a go mate and u will find its actually ok… well in some cases anyway.
WOO HOO ! ! !
Rod
Iv tried a bit of HDR work early on .
Personally I dont like it even when using photomatix pro . The images results you get are really fake looking expesically with landscape and waterscapes , (could have been i wasnt doing it right or taking enough exsposures ) But havent really seen any stunning images with HDR on the web either.
As youve done I found the best way to increase dynamic range is to do an exposure blend in PS you have way more controll and yeilds a far better end result
I totally agree Kirk… Im not a fan at all. I think I will be investing more time in the exposure blending kind of HDR than the Tone Mapping side of it with Photomatix.
I think I will drop Photomatix all together and stick with PS for blending.
I couldn’t tell this was a HDR, it looks like a well developed print to me. It looks pretty natural to me.
Maybe you’ve hit the spot with the one over/under instead of the two under/over. Now I’m wondering what could be achieved with a +2, +1, 0, -1, -2 composition, any ideas?
I have only one image that I like from HDR. The rest have been less than I would like. Some photo’s work better than others, I am told. Personally I would rather double process, mask and paint to get the results I want. I do that a lot.
Matt this shot isnt a HDR in the form of being processed with Photomatix and tone mapped. With adding the -2 and +2 exposure bracket you would get better captured highlights and detail in shadow areas which you can blend in.
With this shot I still used my ND filters which allowed me to capture the sky without burn out with only a -1 difference image as clearly -1 would have not captured the sky detail. So with ND grands my -1 shot is more like -4 for the sky. I know flemming mentioned shooting -3 to get the detail in the sun, but I think this shot has enough detail to make it look realistic.
I will try a +3 and -3 but rely on my grads to give me a good base exposure at 0 and with the -3 and +3 images I will blend into the base shot. All trial and error.
Now after all this editing and mucking around with one shot. Imagine doing a panoramic with it. Talk about a killing a day.
My blunt OPINION…. Blending exposures manually shits all over photomatix HDR and the like.
Nice shot Matt, it has come up reasonably well. Looking forward to more images using a similar technique.
HDR is not for everyone, but I still think Photomatix has its place, maybe not too often but there is a case for it in maybe turning a picture into a canvas art type of thing once in a while.
Yes it looks false but that’s the point, it is supposed to if you are using tone mapping.
Is there anything real in photography these days, nearly everything is false?
Matt I like the job you’ve done here and with some extra work it will look great.
I’m learning more about blending layers in PS everyday. I use transparency gradients a lot to enable smooth transitions between different exposures. I’ve also come across a method of using soft erasers to remove parts of layer. I’ve never liked software like Photomatix mainly because of the fringing from things like trees and water moving position during exposure. There are other reasons why I dislike it but I think it’s been mentioned before. I’d say keep at it because the results can be quite pleasing and effective.
oh and on the panoramic front it’s probably not as bad as you think. if you have say 5 images to stitch, each with ev -2,0,+2 then you can use a stitching program called hugin to generate a file with control points that can be adapted to any set of images. you can generate three separate panoramas at ev -2,0,+2 using the same control point file. you will need a powerful computer but you just process the images the same way with transparency gradients because all your panoramas line up underneath. i hope that makes sense!
Thanks for the info Cain. As always in Photoshop there is 100 ways to skin a cat. I have heard of that program Hugin. Wonder if PTGui can do the same. I’ll look into it. Im sure it would eat a lot of processing power but well worth it.
The PTgui Pro version can stitch HDR panoramas. I only own the standard version so haven’t tried it yet.
I have the pro version… I’ll give it a go this weekend. Just reading up on it now. The new version of PTGui is so much faster.
Yeah I bought the 8.0 version of PTgui too and it is almost twice as fast as the older versions – very nice!
Mine was a free upgrade (free upgrades within 18 months of purchase). Because of the slow speed thats why I turned to CS3. Now if only PTGui could process RAW files then that would be helpful.
You’re on a mac aren’t you? I guess CS3 is a lot faster on a mac and perhaps PTgui is slower.
On my PC PTgui has always been 10 times faster than stitching in CS3 and now with version 8.0 there’s no time to make coffee. Final stitch is done in 2-3 minutes.
Unless the final image stays in a 32bit format i.e. exr, .hdr or 32 bit tiff then what you’re doing really shouldn’t be classified as HDR but simply as exposure blending.
Also, just blindly shooting -1, 0, +1 exposures or -2, 0, +2 isn’t really going to work either. You need to correctly expose for the scene when shooting with exposure blending in-mind just like you would when shooting a normal image.
If you don’t expose for the shadows and highlights correctly then no tone-mapping algorithm will give you the results you expect. The easiest and quickest way to determine the exposure range is to spot meter the shadows for the +ve exposure and highlights (sun etc) for the -ve exposure.
Once you have your exposure range you need to set the spacing for the exposures. With most new DSLRs 2 stops apart gives enough overlap between brackets to work well. If you’re using an older DSLR like a D70 then you may want to bracket images every stop. Bracketing -1,0,+1 using a 1DsMK1/2/3 is really a waste and doesn’t give the tone mapping application anywhere near enough data to correctly fuse the exposures.
Like they say, garbage in equals garbage out.
If you want really nice results then you really need to put in a lot of time and effort. Plus it really helps to understand what’s happening in the background.
Two really good books that everyone should read are:
1. The HDRI Handbook http://tinyurl.com/hdri1
2. High Dynamic Range Imaging: Acquisition, Display, and Image-Based Lighting http://tinyurl.com/hdribook2
The 2nd book is a lot more technical but you’ll know almost everything you’ll need to know after reading these two books.