Knowing what depth of field you have in your photos is essential to making sure your capturing images that have the exact look and feel you want to have in them. Depending on what sort of photographer you are you might be wanting to achieve different types of depth of field in your images. For us landscape photographers it is all about maximum depth of field, sharp detail through the whole scene. For a portrait or wedding photographer you might be wanting to achieve a selective depth of field where the subject is sharp but the background is soft which adds attention to the subject. But for each kind of photographer to get this wrong can be disaster.
In this article we are going to look at what Depth of Field is. How it works in a practical sense, How to implement it out in the field, Learning Field Tests, How to extend depth of field beyond what can be captured with a single shot and more.
WHAT IS DEPTH OF FIELD
Depth of Field is what is in focus (sharp) from your point of focus towards you and what is in focus (sharp) from your point of focus past it towards infinity. Or what people would say is acceptable sharp in your image.
When your depth of field drops off from your point of focus towards you and the loss past the point of focus is subject to certain factors. The first being the Aperture you are using and the second is your distance from your point of focus and third the focal length of the lens your using as well.
UNDERSTANDING DEPTH OF FIELD

Explaining the above terms.
Field of View Starts – When you look through your lens this is the point that you see at the bottom of the frame. This will be determined by the focal length of the lens you are using and your composition. For a landscape photographer using a wide angle 16mm lens with a heavy focus on the foreground, this field of view could start at 2-3 meters in front of you. If your shooting with a longer focal length like 100mm then you might find that the start of your field of view could be 30 meters in front of you even more.
Point of Focus – The point in your composed image that your going to focus on. Your subject (person, animal, for landscape photographers it is a bit different you focus on a point in your image that will set your depth of field to cover your near limit and give you infinity in the background. More on that later).
Near Limit – This is the point or distance from your point of focus towards you that has acceptable sharpness. From this point towards you the depth of field is not sharp.
Far Limit – This is the point or distance from your point of focus away from you that has acceptable sharpness, from this point to infinity sharpness will be lost.
The point between your Near Limit and Far Limit is your depth of Field.
HOW APERTURE EFFECTS DEPTH OF FIELD

The Aperture of your lens is the opening in which let’s light into camera. The size of this opening is referred to as the cameras f-stop. The lower / smaller the aperture number (eg f2.8) the shallower the depth of field will be. (again subject to your distance from your point of focus). The higher / larger the aperture number (eg f16) the greater the depth of field will be. (again also subject to your distance from your point of focus.)
For more details on What is Aperture please refer to our article.
DEPTH OF FIELD CALCULATING
Calculating your depth of field subject to your aperture, focal length, distance from your subject and the camera your shooting with is complex, that’s why a depth of field calculator makes things so much easier and the one I have used and recommended for years if DOF Master. This link is to the desktop version. I’ll be using this to talk through some examples below.
DEPTH OF FIELD PRACTICAL EXAMPLE

Ok lets assume I’m on safari and sitting in a Jeep looking at this Lion through the lens of my 70-200mm f2.8 canon lens on my Canon 5D mkIII. The Lion is 20 meters away and I focus on it. My lenses focal length is 100mm and I choose f5.6 as my aperture as I know it will kind of give me a depth of field look, but I am not sure.
Now jump over to DOF Master and enter in these settings. We get a near Limit of 15 meters, a far limit of 30.2 meters with a depth of field of 15.2 meters for the whole shot.
So from the Lion towards me I get 5 meters of depth of field before the image starts to soften. So if my image is composed within this 5 meters everything will look sharp. If it isn’t then the foreground will soften. With this example imagine your not in the Jeep but crouched low in grass and the grass is encroaching into the foreground of your image, the grass is only 5 meters in front of you. You are going to get that nice soft effect to the grass, everyone knows what it is, but your depth of field loss with it complements your shot perfectly with the sharp focus on the Lion.
Now behind the Lion you only have 10.2 meters of depth of field before it starts to be lost. So with that tree behind the Lion it is starting to maybe soften. Sounds like a nice shot with excellent Depth Of Field for what I want to achieve.
Now let’s say I just change my aperture to f11, I don’t move my position at all. My near limit is now 11.6 meters (not 15 meters), no big deal. Our far limit is 61.6 meters (not 10.2) meters, with a Depth of Field for the shot of 49.7 meters, not 15.2 meters like we had at f5.6.
The biggest change in this shot is going to be what you see in the background, that nice separation look you get from the Lion being sharp and only 10.2 meters behind him being in detail is now lost and extended another 39.5 meters which is alot.
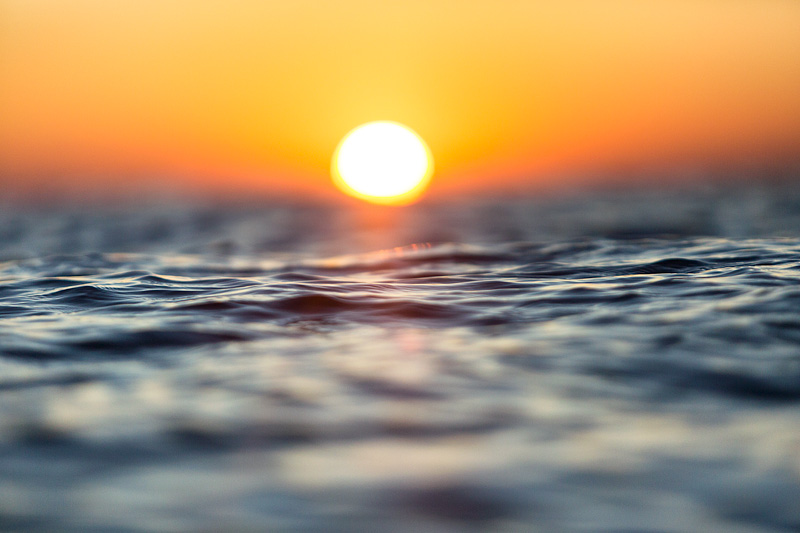
Canon 5D mkIII, 70-200mm lens (@195mm), F2.8, focus point about 15 meters
This is a surf image I did on sunrise. I really wanted to get a shallow depth of field to blur the foreground and background as much as possible. With the camera settings type them into DOF Master and you will see that I had a total Depth of Field of about 1 meter. From my point of focus I get .5 of a meter and past it .54 of a meter. With this kind of shoot it dosent really matter whats before or after as the whole shot is the effect.
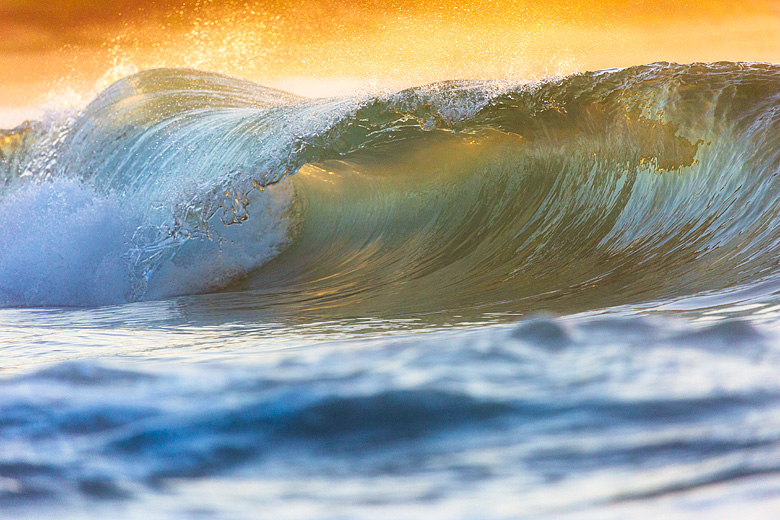
Canon 5D mkIII, 100-400mm lens (@400mm), F5.6, focus point about 40 meters
With this wave shot I was running in and out of the surf just before it broke. Shoot and Run. With the settings above from my point of focus I have a near limit towards me of 1.61 meters and past my point of focus of 1.75 meters with a total DOF of 3.37 meters. When you view the image you can see that the wave in the back ground softens. The point of focus is just to the right of center. The really soft foreground wave in the image is like the grass I talked about in the Lion example well in the depth of field loss area and very soft and it complements the image and gives it separation.
FIELD TESTING DEPTH OF FIELD
With anything seeing is believing and seeing how depth of field works in a controlled environment when it doesn’t matter is far better than learning the hard way when it does matter. A good way to see how Depth of Field works is to set yourself up a working example.
Set your camera up in your dining room and cover your table in house hold items and space them apart from each other. Now focus on an item in the middle and at your cameras widest aperture (ie f2.8) take a shot and then walk your aperture up until you get your smallest aperture (ie f22). Then go and review those items. Type the settings into the DOF calculator and see how they relate.
FOCUS BLENDING - EXPANDING DEPTH OF FIELD
Focus blending is the shooting technique that a photographer can turn too when the shot they have a composition that has objects in the foreground that can’t be captured sharp with a single exposure. This technique is mostly used by landscape photographers shooting with a wide angle lens.
It is a technique that I am yet to invest anytime into practicing but the idea of the concept is to have your camera tripod mounted and have the lens focused at a point where it’s near limit covers the field of view, then you take your shot and manually re focus the lens by turning the focus ring slightly towards infinity. Some people will use the live view feature of their camera to do this, others just turn the focus ring and shoot then repeat the process until the cameras focus ring is on infinity.
Then in photoshop the images are aligned using the Edit > Auto – Align Layers. This kind of shooting can be hit and miss and it requires a sold understanding of photoshop to correct any alignment errors manually and problem solve. With this kind of shooting you are well and truly shooting towards a more advanced form of photography where you almost need to pre visualise what your final shot will look like before you even take, and shoot the images to form it. This is an exciting way to shoot and I am sure you will get there.

