Exposure blending is the natural progression photographers make when they move away from using their graduated neutral density filters to capture an evenly exposed image. Most of the time this move is done when they become frustrated with the limitations you encounter when shooting with grad filters, especially with scenes that become affected by the grad filter when you didn’t want them to, but it is unavoidable.
Exposure blending can be as simple and blending two images together using a basic mask and the gradient tool. Which we will discuss and illustrate here, to very complex mask creations using luminosity masks and blending more than two images together if needed depending on the complexity of the image and light.
But before we get into that you need to learn how to walk before you can run and using the basics of Exposure Blending is an excellent place to start. It will allow you to delve deeper into using photoshop to process your images and it will allow you to start building the foundation of you thinking about the images you need to take out in the field to later blend in photoshop.
One of the great things about exposure blending is it will really open your eyes to seeing how images can be created in complicated light and you will be able to look at other photographers work and think “Exposure blend” for sure. It is a technique and process worth learning and mastering.
THE IMAGES YOU NEED FOR EXPOSURE BLENDING
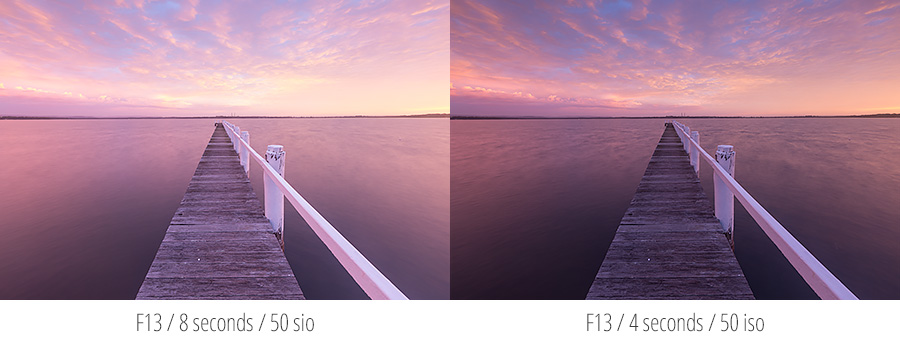
The whole concept behind using exposure blending to create your image is to have a minimum of two images that your going to join together to make one. At this beginning stage of exposure blending you will most likely have one image where the foreground is correctly exposed and the second an image where the sky is correctly exposed and you blend the two together.
Most of the time when you take the exposure for the sky your going to need to underexpose your image from the shot you have taken for the foreground by at least one or two stops. (If your unfamilar with “What is a Stop” then please read this article). So in the example used in the article the foreground image is taken at 8 seconds and the sky is at 4 seconds. This is a one stop difference.
Note: This is exposure blending so to change the difference in your images brightness to blend you only change the exposure by changing the shutter speed or camera ISO (99% of the time it will be shutter speed). Never change your camera’s aperture as your images will not blend well. For best results you need to be taking your images on a tripod so when they align in photoshop it is a pixel for pixel overlap.
ALIGNING YOUR IMAGES FOR BLENDING
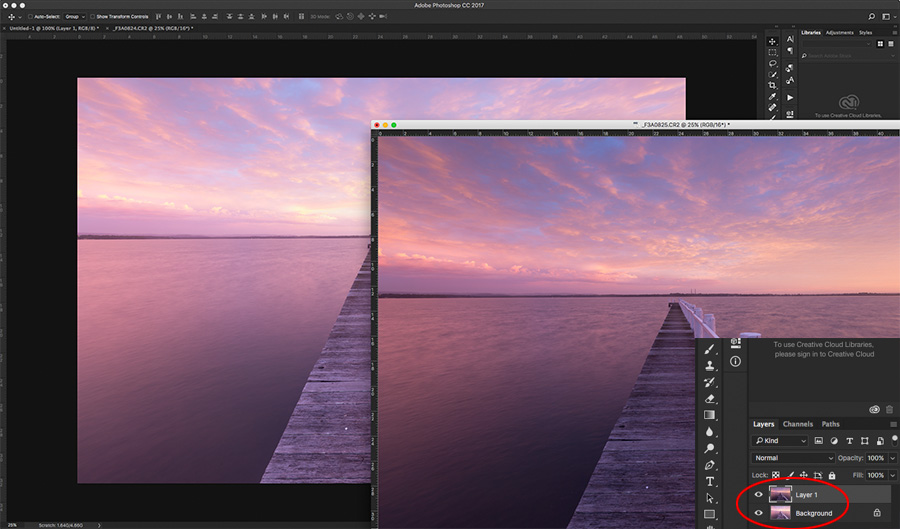
The first part in our basic exposure blend is to get all our images together and stacked on top of each other. In this example we want to have the dark image on the top. So to do this have it so you can see both your images in photoshop. For me my images sit in the top bar and if I click the image I want and drag it down slightly it un selects from the top menu. Once you have done this you should see something similar to the image above.
Now to put that dark layer on the light one what we do is hold down the shift key and click on the dark layer and move it over to the light one and release. Because you held down the Shift key it will snap perfectly to the borders of the light image and you should now see it in your layers pallet, titled Layer 1.
ADDING THE LAYER MASK
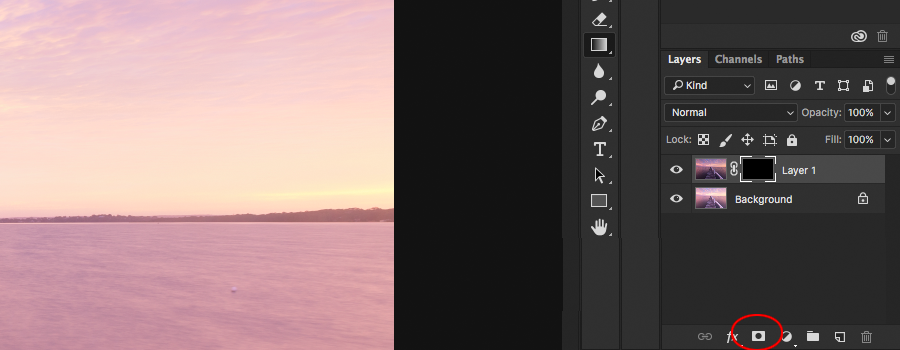
Now is the time to add the layer mask to your top layer. This is very easy. Click on the top layer so it is selected. Then at the bottom of the layers pallet you will see a white box with a grey circle inside, click on this while holding down the Alt key and it will add a layer mask that is black to your layer when you do this you will find that you can no longer see the dark layer and only the bright one underneath.
This layer mask is the power behind Exposure blending. For more information on the basics of masks and how they work please view my video tutorial on “How to Use and Understand Layer Masks“.
FINDING AND SETTING THE GRADIENT TOOL FOR BLENDING
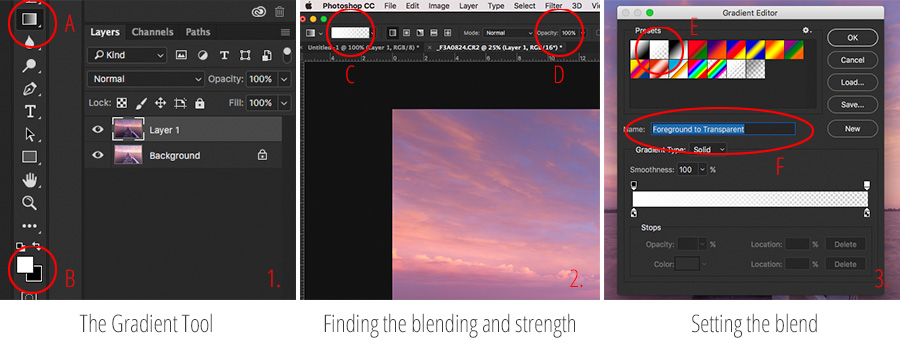
Now that we have our dark image on top of our light image and have added our mask to it. It is time to start our blend, but before we do this we need to make sure that we have the tool that is going to do this for us set up correctly. The tool we are going to use for this blend is the gradient tool.
You can find the gradient tool in the tool bar. Marked A in the above image. When you click on this the top bar of photoshop will change and offer you a range of options. Most of the time the default it what we want, but if you or someone has played around in photoshop it could be different. So lets look at what it needs to be set on.
Point B is your foreground and background colours. If you see any other colour here other than black and white hit “D” on the keyboard. This will set it back to default Black and White. Hitting “X” will toggle the black or white as either the foregound or background colour.
Point C is where you can edit the gradient. Clicking on this will open the option panel you can see in 3. Just next to Point C you can see five small boxes. For what we need the first box needs to be active it is the Linear Gradient. It should already be selected as a default.
Point D is where you can see the strength / opacity of the gradient. If we are painting with the gradient tool Black to Transparent and this opacity is set at 50% then we will be painting from 50% gray to Transparent not black.
Point E is the gradient blend that we want. Foreground to Transparent. So if we are using black as the foreground colour it will paint Black (subject to the opacity as discussed in Point D) to transparent ie nothing.
Point F will show you that you have the right option selected and below this it shows you how the gradient will be applied. This can be edited but as a default it is perfect for what we need.
BLENDING YOUR IMAGES TOGETHER USING THE LAYER MASK AND GRADIENT TOOL
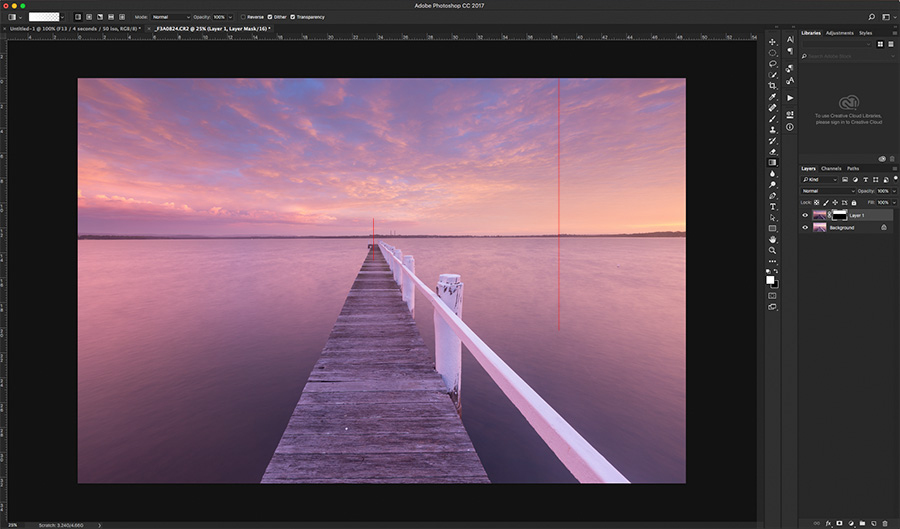
The final stage of your Exposure Blend is to now use the gradient tool and paint on your black mask to reveal the sky on your image.
To do this make sure that you have white set as your foreground layer. If you get it wrong and paint on your mask with black you will see no change.
Now with your gradient tool selected (G) you hold down the shift key (this will keep your gradient vertically straight) now pull down from the top of your image to say 1/3rd past where you want it to blend and release and you will see a white gradient applied to the mask and your sky revealed.
Now if this isn’t what you want no problem it may take a few goes. Just hit Command Z (on a Mac) or Control Z (on a PC) and you will go back on step and just repeat.
The way your gradient tool is going to work is if you start from the top it is going to apply 100% of the gradient from the top and from there it is going to go to transparent. If you start the gradient tool from the middle of the sky it is going to apply 100% of the gradient to that point and then from there graduate the effect from 100% to transparent.
Have a play a play around with it. If you totally ruin your mask click on it and drag it to the bin icon on the layers pallet and just add a new black mask.
Note: The gradient tool is just one of many ways you can paint on your mask. If you like you can apply the blend using you brush tool (B). The same process applies with the opacity of the brush which you will find in the top options section. Just make sure your using a feathered brush it will give you nice blend.
TROUBLESHOOTING
Ok because you are beginners I totally understand that you might get a few things wrong. When your doing this you might find the following and this is why and how to fix it.
- When you apply the mask your image turns white with the gradient. This is because you have the image selected and not the mask. Undo the step and click on the mask and try again.
- When you apply the mask you don’t see any result. This is because you have your foreground colour set to black. Hit X and it will toggle to White and try again.
- You have everything correct but the mask isn’t being applied correctly. Ok this will be because the wrong mask is selected. Above there is an image talking about the setting up the gradient tool. Next to point C there were five boxes I mentioned. Make sure the first box Linear Gradient is checked.

