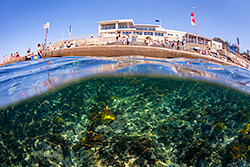
Mount Wilson - 5 image panoramic stitch - F11 @ 1 sec, 50 iso - Photoshop Photomerge.
As a landscape photographer that cut his teeth shooting wide angle panoramic images on a film camera I find it hard to beat a good panoramic scene and I think for any photographer when they see their images all come together it is impressive. But back in the day I had it easy, my film camera did all the hard work, it was only one image, all the water aligned perfectly and my horizon was straight, my exposure was even through the image from left to right. But enter the world of digital panoramics and I am sure we have all seen and can all list off the problems associated with shooting digital panoramic images. The good news is I know all it’s tricks and how to overcome them and you don’t need expensive gear to get the job done right.
In this article I am going to talk about the pro’s and con’s of shooting digital panoramics, how to do it and the equipment you do and don’t need.
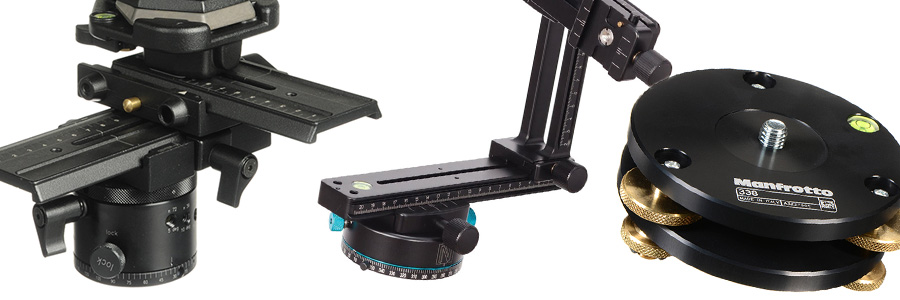
Manfrotto 303 QVTR Head (Left), Nodal Ninja (Center), Manfrotto 338 Levelling Base (Right)
WHAT YOU DONT NEED TO DO DIGITAL PANORAMICS
When I first started to do digital panoramics I was under the impression to do them you needed the “Right Gear” and that was in the form of special panoramic head that rotated the lens around it’s Nodal Point. Your Nodal point is the point where the light entering the lens converges and is considered the center of perspective, ie the center point of your lens. Now the idea of a panoramic head that rotates around the nodal point is for it to give you a sequence of images that are correctly taken in terms of perspective to each other and I totally agree with that and that’s why I paid $1500 AUD for a panoramic head. After owning the panoramic head for a year it’s size, set up and weight had become tedious. So I looked into other products and essentially my $1500 panoramic head was only effective if you actually had it level.
So I went out and bought the Manfrotto 338 levelling base and when fitted to your tripod allowed you to perfectly level the tripod head so when you rotate it each shot is level. So with only this fitted, I started to test it and what I found is that my images shot with my $1500 head and my shots taken with just the 338 levelling bases were the same. They both still had the same issues you get with aligning panoramic images. The only difference is when the camera is fitted to the panoramic head the camera is held in a vertical position and with the 338 levelling base it is horizontal so you don’t get as many files to make your panoramic. But after 10 years of shooting like this and printing my work every day, even up to 3 meters wide, there isn’t much more you can do with a 400MB file than a 200MB one. File size isn’t everything.
So a few weeks after buying the 338 levelling base I sold my $1500 tripod head to someone else who believed it is what they needed to do panoramic photography.
Note: You can purchase an “L” bracket for your tripod head to hold the camera in a vertical position but I personally find shooting panoramics in a horizontal position better for stitching.

Manfrotto 338 Levelling Base, Solid Tripod and a Remote Shutter Release
WHAT YOU NEED FOR DIGITAL PANORAMICS
You really don’t need much to start doing digital panoramic photography, as I have already mentioned we don’t need an expensive panoramic head a simple levelling base like the Manfrotto 338 Levelling base is perfect. Another essential piece of equipment is a remote shutter release. Something that will simply trigger your shutter will do as you will find that some panoramics you shoot time will be of the essence of getting the best result as you will be “Shoot… move… shoot… move… shoot… move…”. If your planning on doing exposures faster than 1/100th of a second then pushing the shutter button yourself would be fine, but for me if I am using a tripod to shoot panoramics then I might as well use my remote regardless of a fast shutter speed. The last thing needed for good panoramics is a solid tripod. I keep saying this in the articles I write as I can’t emphasise enough the importance of a good tripod and one that can support and manage the weight of your camera and any lens you put on the front.

YOUR CAMERA SETTINGS FOR DIGITAL PANORAMICS
The camera settings you use for your digital panoramic are critical. When you look at a panoramic image regardless if it was shot on film or digitally it is a single image. That single image dosen’t have different points of focus, it dosen’t have different area’s of exposure, it dosen’t have different sections of white balance. So when we shoot our panoramic you need to keep all this in mind.
With every photo you take for your panoramic the images taken need to be the same shutter speed, iso and aperture. If your image has challenging light because your shooting sunrise and sunset and one side is really bright and the other side is dark then you have to make a choice what to expose correctly for. For me I will lean towards making sure the brighter side of the image is correct and I will rely on the dynamic range of my digital camera and RAW capture to pull detail out of the darker areas. People eye will naturally look for detail in the highlights and understand that the image darker the further you move away from the light. So go with that.
With every photo you need to make sure that you use the same focus point. So before you take your photos pre focus your lens and then flick your lens from “Auto focus” to “Manual”. Failure to do this will result in your images having different depths of field and the extent of this depth of field difference will be subject to the scene your shooting.
Now white balance, yes your images all need to have the same white balance as they will differ from image to image. But because your shooting RAW you don’t need to worry about this as part of your camera capture set up, you can easily do this as part of your camera RAW editing and making all the white balances the same for the images.

THE CAPTURE PROCESS OF SHOOTING DIGITAL PANORAMICS
When you have captured your images you then need to enter them into software that will align and join them for you and it is at this point you will see if your panoramic is a success or fail. In order to increase your success rate you need to make sure your giving the program images not just what it needs to do a good alignment, but images that make the stitched panoramic useable in terms of smooth lighting through out your image.
I have read in magazine articles and read online photographers saying you only need about 20 – 30% over lap in your images for the software to do the alignment and in essence they are correct but they are missing a few key points, as alignment isn’t the only thing you want in your image.
- I have found that with complicated scenes or scenes with limited detail in them for the stitching software to identify to blend that having more overlap results in a better smoother end result.
- When you stitch all your images together you might find one area has a problem, quite often you can remove this image from the sequence and try the stitch again and it can be a lot better.
- Light fall off. This is a big one. When you shoot your images especially on sunrise or sunset you have one side of each photo a lot brighter than the other, if you only have 20 – 30% overlap you can and will find strange banding in your sky. This is cause from the bright part of your first photo being blended into the darker area of the next image. A 50% overlap removes this problem.
- Alignment issues will be your main headache when it comes to stitching. Broken horizons, miss aligned areas. When you have more of an image to play with you can blend in an area that needs the repair with a better result.
- When your shooting seascape panoramics, wave sequences are easier to align and if needed repaired with images that have more overlap.
Moral of the story when it comes to shooting panoramics… shoot with a 50% overlap and you don’t need to be critical about it. Just guess. What you see on the left or right of your scene (depending which way your shooting) put what’s on the edge in the middle of your next shot and repeat. If your overlap is 70 or 80% who cares. Be more worried about the shots that are 20 – 30% as there the ones that will put your panoramic at risk.
Below is the final edited panoramic image from the stitched images. The excessive overlap allowed for a good quality alignment of the jetty and also repair of the jetty in parts. The image has good clean smooth light transition from a very bright right as it moves to the left.

The final result of the panoramic stitch shot with 50% + overlap. F13 @ 10 sec, 50 iso - Stitched in PtGui

SOFTWARE FOR JOINING YOUR PANORAMIC IMAGES
Since doing digital panoramics I have only used two programs for putting together my panoramic stitches. The first is the most obvious and that is Photoshop’s Photomerge that most of the time (80%) it does a great job. For the times when you know the image can be made and Photoshop isn’t playing nice I then run the images through PtGui which is a dedicated standalone software application that stitches your images as well.
PtGui is a great program but one thing I don’t like about it is after 12 months any further updates on the program requires you to pay more money. I use the Professional version for the additional features. The standard version is $114 AUD and the Pro Version is $214 AUD. If your shooting a lot of digital panoramics then buying this software would be worth it, especially if you’re finding Photomerge not doing an overly good job on some images.
When using Photoshop’s Photomerge I will always use the layout selection of “Reposition” for my stitches to get the most natural perspective. You can find Photomerge in Photoshop under File > Automate > Photomerge.

MAKING EDITING LIFE EASY FOR YOURSELF
Sometimes it is the simple things that you do that make your life easy. When you’re out shooting your digital panoramics get into the habit of helping yourself identify where one panoramic or series of images start and finish. It could be as simple as taking a shot of your hand at the end of a panoramic sequence or in the case of my recent shoot in the Blue Mountains in the rain I just dropped my umbrella infront of the camera to set the separating image. So easy isn’t it.
THE ADVANCEMENTS OF TECHNOLOGY
When I started landscape photography over 20 years ago it was with a panoramic film camera and digital camera’s were just starting to enter the market at the huge Megapixel ability of 4MB. Fast forward 10 years and shooting high resolution digital panoramic images with fields of view not even capable by the film cameras was now the norm and film photographers were starting to sell off their film gear for this new process. At the time if I had a choice to go on a trip and either take my film camera or digital one, I would have chosen my film camera without a second thought. Fast forward another 10 years and as I sit here and write this article I have probably shot about 2 rolls of film in three months (that’s only 8 shots). The only time now when I pull out my film camera is when the light is super crazy and I just want to get it on film, but in reality the digital panoramic shot I have been able to shoot and put together hours after is fantastic.
If I was asked the same question again which camera would I take on a trip the answer would be my digital gear without a second thought. The advancements in technology and the flexability you get with a digital camera cannot be matched.

