When you’re out shooting as a landscape photographer you come across many different and complicated lighting situations and there are many ways to handle them. A photographer whose skills are more advanced will opt for shooting a range of images at different exposures and blend them in Photoshop to get a perfectly balanced photo. But what do you do if your Photoshop skills arn’t at that level or you’re doing a digital panoramic stitch and you don’t have the luxury of being able to exposure blend each image. Well then you’re stuck to making sure your exposure is perfect in camera so when you’re back home in front of the computer and ready to process that RAW file, you have the best possible image. But if you don’t then you’re going to have some problems getting the most out of that shot.
In this article I am going to talk about one of the most common histogram faults that you’re going to come across and that is the dreaded “Twin Peaks”. The problem exists when you have a bright sky and a darker foreground and it is most common when you’re shooting a sunrise or sunset and the light from the sun isn’t luminating the ground directly.
Before you go ahead and read this article I encourage you to read my article on “How to Read and Understand Your Histogram” to give you a good foundation on what will be talked about in this article.
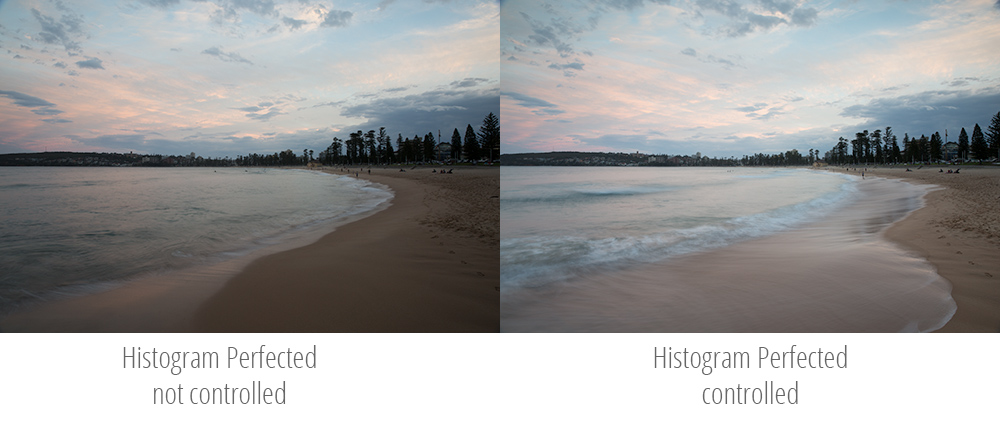
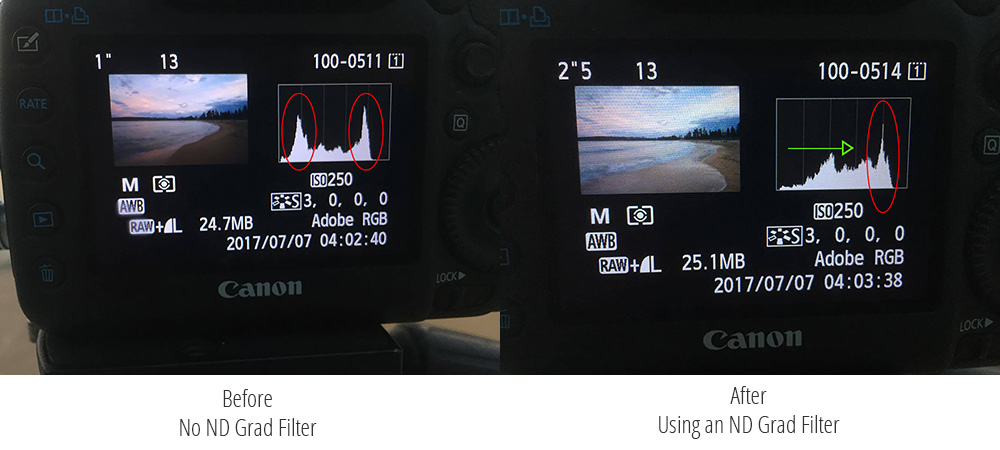
In the above image are two RAW files that have been taken straight off the camera and not touched at all (ie processed). There a perfect example of two images that have been taken where the histogram on each photo has been positioned correctly. But as you can see one image is clearly better than the other in terms of exposure and this is because the image on the right has been histogram perfected and the image on the left hasn’t.
Have a good look at both images and you will notice that the sky in each is pretty much the same, but the foreground is suffering on the left image, where on the right the foreground has a lot more luminosity to it and the reason for this is explained below.
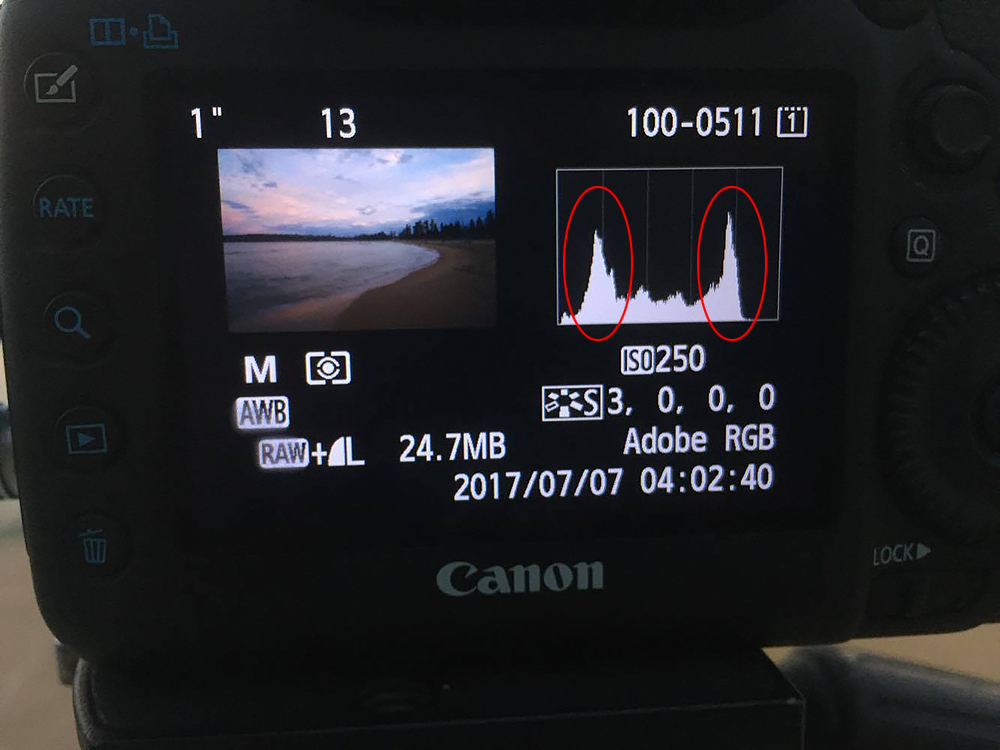
Twin Peeks - High Shadows due to low exposure. High Highlights due to bright sky
USING A NEUTRAL DENSITY GRADUATED FILTER
In the above image we have our image that technically is placed in the correct location when it comes to where you want your highlights to sit on your histogram (it looks like it could go a little bit more right), but the obvious problem here is the foreground is noticeably dark and this can clearly be seen on the left-hand side of the histogram with the spike and as outlined in our “How to Read and Understand your Histogram” article you will know the height of your spike just means the number of pixels in the image that have that tonal value. The image has very little mid tones compared to shadows and highlights.
What an image like this is crying out for is to be balanced correctly. For the shadows and highlights to be brought closer together using a ND Grad Filter (How to Use Neutral Density Graduated Filters) and once that is done the histogram of the image is then ready to be positioned back to where is belongs. But now let’s see what happens when the ND grad filter is put over the sky.
Two Stop Neutral Density Filter Use Over The Sky - Joins Histogram and Balances all Tones
JOINING THE HISTOGRAM TOGETHER
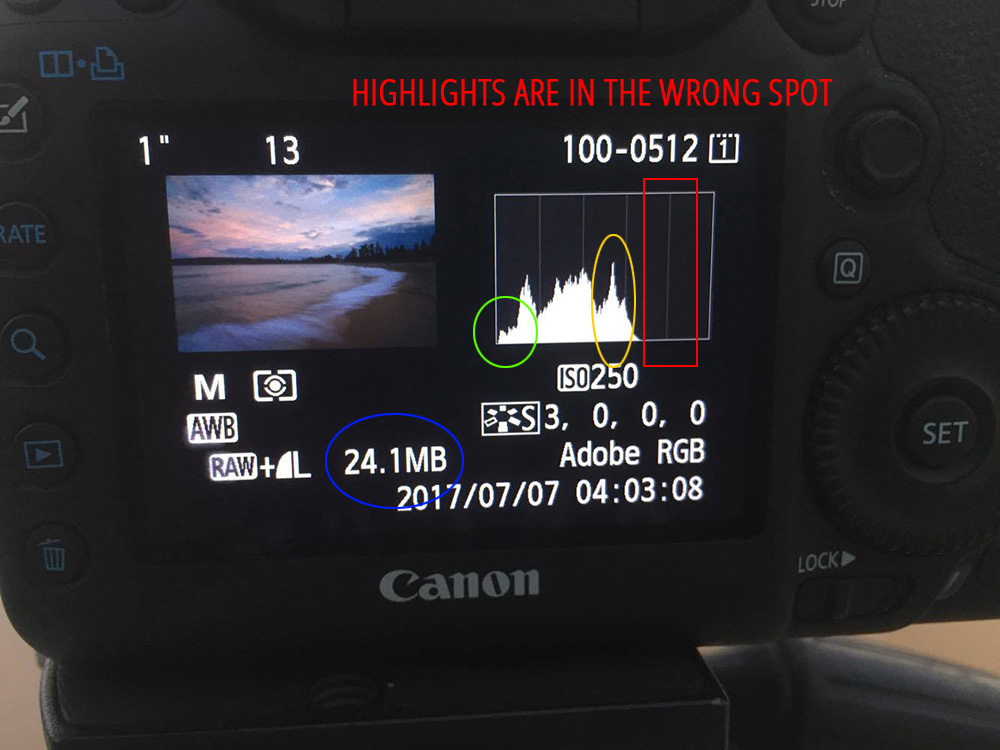
With the use of a two-stop Neutral Density Graduated Filter the change on the histogram is very obvious. The filter has brought the histogram together in terms of controlling the highlights bringing everything closer together to give a much more even tonal ranged photo. So with the use of the graduated filter, I want you to note the following.
In blue, due to the removal of the highlights with the ND grad filter and moving them to the left of the histogram the RAW capture information has dropped from 24.7 to 24.1 MB. So our capture has less information for processing.
In green, you can see that using the ND Grad filter added no additional shadows to the image as it stayed pretty much the same.
In yellow this is where our highlights now sit on the histogram and in red is where they should be. The images histogram is sitting in the wrong position and all it needs is exposure to move it into it’s correct position to perfect this shot.
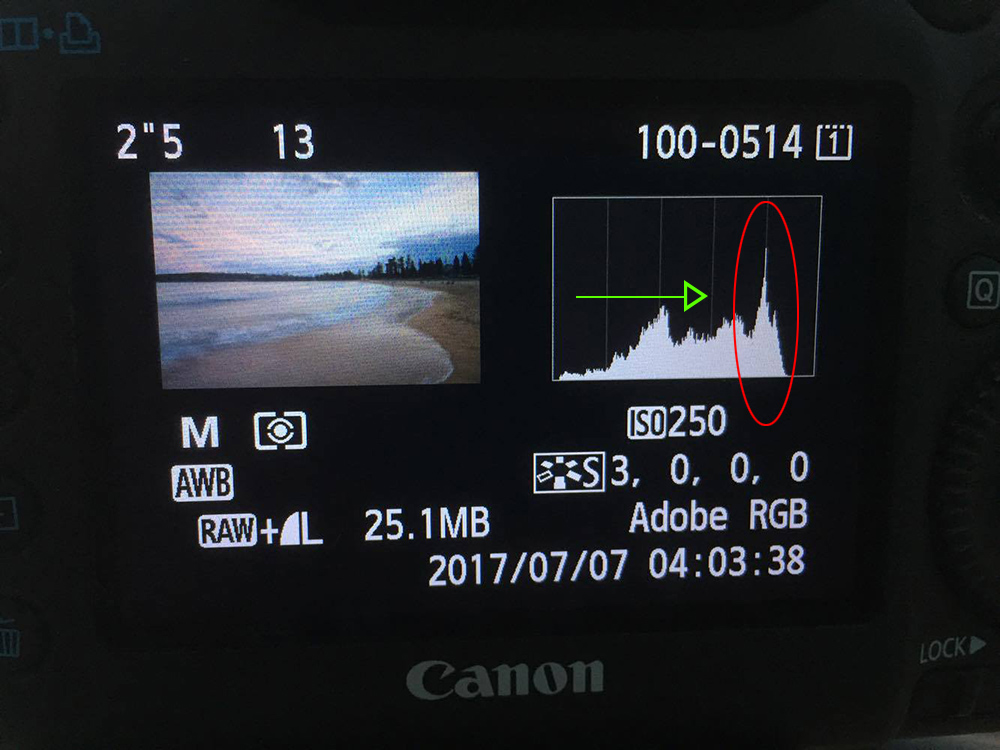
The image after adding 1 and 1/3 rd stops of exposure
LIFTING THE EXPOSURE AND HISTOGRAM PLACEMENT
This is our photo now perfectly balanced. One and one-third stops of exposure was added to the shutter speed to lighten the image and move the histogram into its ideal location for where highlights should sit. With the correct positioning, you can see that all shadows in the image have flattened out and now sit as more of a mid tone than a shadow. Our RAW file is now 25.1 MB indicating that we have more information in our image that will help with editing if needed.
For more information on “What is a Stop” you can read this article.
THE PROCESS OF HISTOGRAM BALANCING
The process of shooting using your histogram to perfect exposure is very easy now that you know the “why is my histogram like that” and “knowing how to fix it”. I put it simply as “shoot your image”, “check your histogram placement”, “balance the exposure with a ND grad filter” and “Push the Exposure” to where the highlights need to be and your done. Once you know how to do this you will be able to correct your image in a matter of seconds.
TROUBLESHOOTING
When shooting like this you can notice that when you move your exposure further right on the histogram and add more brightness to your image that you start to loose some of the mood in your sky. A simple solution to this is to use a stronger ND grad filter, in the example here I have used a two stop soft grad filter, so maybe try a three. Or you can back off on the exposure a bit and position the histogram not so far right. Because you have balanced your photo a lot better, you have more information in your shadow areas. So you can afford to slightly underexpose your images to keep that sky drama and use the power of your RAW file to open up those shadow areas in post production. The key with any digital shooting is trial and error, shoot a range of images and see what works best. There is no fluking anymore in your photography when your know what you’re doing, but testing out to see what works best and what doesn’t.
One thing to keep in mind when shooting and moving your histogram is to ask yourself what kind of highlight do I have, or do I have a highlight at all and where on the histogram should it go. My article “Exposing to the Right – Histogram Shooting” talks about the traps of pushing everything right when it has no business of going right.
FURTHER READING
Below are some of the articles I refer to in this article that will help you get a better understanding of what was discussed if you’re still having any problems.

