Everyone loves to put the Polarizer on their camera and see the wonderful effect it has to the sky, that gorgeous rich deep blue and amazing water, if only your digital camera was able to capture exactly what they eye can see, but the thing is to be careful as behind that beauty in the sky is a histogram trap that’s just waiting for you when you get home.
In this article I am going to talk about the traps of over polarising your photo and show you examples of how to avoid the problem, and a few easy editing techniques to get that polarised sky back.
If you would like some additional background reading on using your Polariser I have this article “How to Use Your Polariser Correctly” and for a good foundation on your histogram I have this article “How to Read and Understand Your Histogram“.
Dark top left sky can leave an un flattering blue, even if it looked great at the time of shooting.
Over polarisation is a problem that anyone can make, but the thing is to know that it exists, how it effects your images on screen and how to work around it. In the above image I was caught out where I thought I had the perfect amount of polarisation in the sky, but because the image was a digital panoramic I forgot a key principle of using a polariser which is that it works it’s strongest 90 degrees from the sun and as a result my far left on this image was a lot darker than what I had wanted and expected.
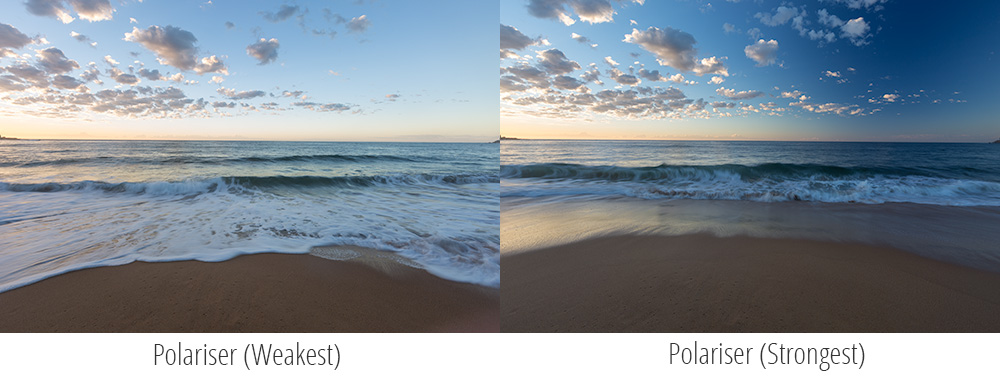
STRONG POLARISER AS AN IMAGE
In the above example, we have an image where the ISO, Shutter Speed and Aperture are the same. F11, 1/5th sec @ 50 ISO. The only difference between these two photos is with the image on the left the use of the polariser is at it’s weakest and with the image on the right it is at it’s strongest. When taking these shots I can tell you that with the naked eye looking through the view finder the polarisation of the image on the right was wonderful. As you can clearly see the image on the right the darkness of the blue is unflattering, by polarising this hard what I have essentially done is take the sky which is a highlight and will sit on the right handside of your histogram and made it a shadow and this is not good, especially at this extreme.
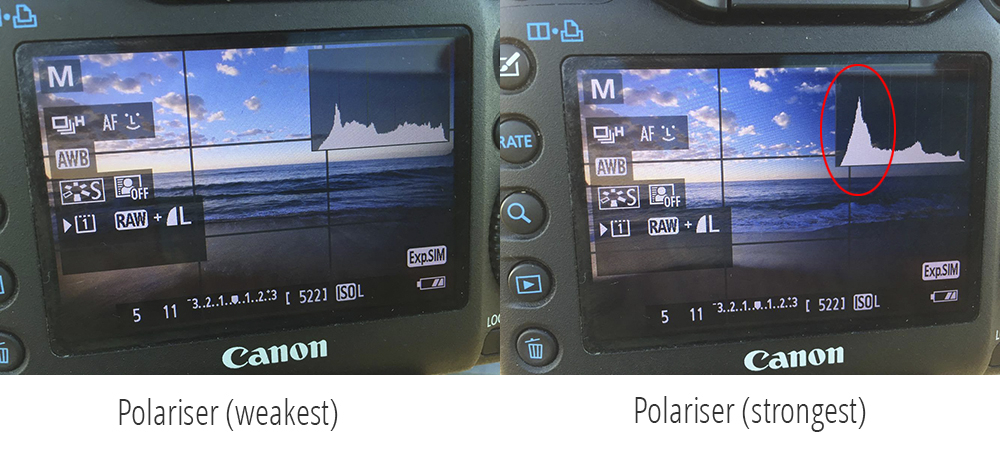
STRONG POLARISER REPRESENTED ON YOUR HISTOGRAM
Looking at the above image you can clearly see what has happened with the histogram. On the left is the histogram for our weakest polarised photo and on the right the strongest. See the clear introduction of the spike in the shadows on the histogram. That is mostly our new polarised sky. Even with basic camera RAW processing I can see and introduce coloured banding and artifacts into the image. Even when trying to process the image the sky is like this naughty child you have to keep an eye on to make sure it isn’t playing up. But the solution is so easy, when your shooting with your polariser put your camera in live view and get your histogram up on the screen, then as you adjust your polariser you will be able to see the effect it is having on the image live. Then find what you believe is the best location on the histogram and shoot. Shoot a variety of images.
THE SOLUTION - FIND COMMON GROUND
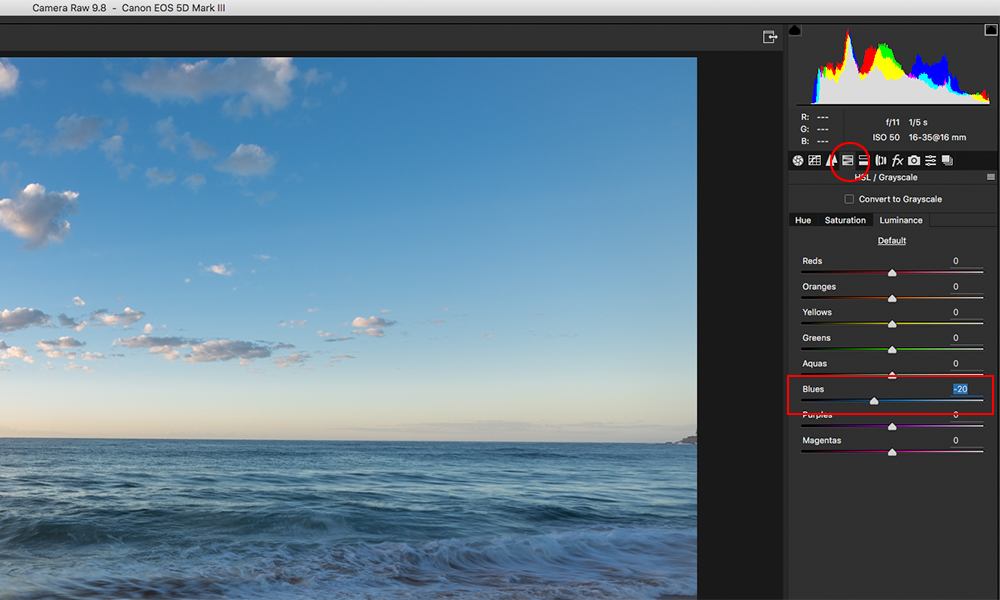
Like with anything the solution is finding common ground where you get your polarised sky but your not effecting your image where processing it is going to be destructive and in this case it is just backing off on the strength of the polariser, as mentioned above use your live view histogram to get that great foundation shot. If your a bit unsatisfied with the strength of the effect of the polariser you can as part of your camera RAW file post production go into the HSL / Greyscale section and select Luminance and in here play with the blue slider and remove some luminance from the image and you will deepen the blue. But in this case your working with real captured data that is sitting in a totally difference place on the histogram than a captured dark blue.

THE FINAL EDITED IMAGE - COMPLETE WITH POLARISED SKY
This is the final edited image of the photo I selected with the polariser effect half way. The use of the polariser has given me nice separation from the sky and the clouds. I was able to enhance the effect of the blue non destructively by removing some of the luminosity from the blue in Camera RAW post production and then in Photoshop using Selective colour and darkening the “Blue”.
Because of the darkening of the blue you are still moving that part of the image to the left hand side of the histogram, but it doesn’t matter, the thing that is important is where it started from, that extra amount of captured details goes a long way when editing shadow areas that have limited amount of detail to give you.











Thanks Matt – that’s a good tip. I have found using polarisers tricky with wide angle lenses.
Regards,
Peter