
Ok, let’s get straight into it. First I’ll talk about ISO for beginners and then talk about how I use ISO in a more advanced way.
Camera ISO is an essential part of understanding how to use your camera correctly. It is one of the key components in the Exposure Triangle. Understanding and mastering it at a basic and then advanced level will allow you to have ultimate control over your shots in terms of being able to capture sharp photos and then to control movement effects in your photos through ISO manipulation and in return will allow you to control shutter speed.
Note: Advanced shooting techniques with ISO is more about understanding how to implement and manipulate ISO to get the result you want than an actual physical practice or technique.
So What Is ISO ?
ISO stands for (International Standards Organisation) It is a setting that makes your camera more or less sensitive to light. Your camera is capable to increase it’s sensitivity in 1/3rd (33%) increments. This small adjustment ability will later on allow you to really refine movement effects in your images.
Your camera will have a preset low ISO of 100. To go slower to 50 ISO it usually requires you to make a change in your camera’s menu settings. Best to refer to your camera’s manual for where this option can be found, or if you can do it at all. Usually when you change and activate this is also will allow your camera to set an even higher ISO setting as well.
For those of you who remember shooting film your ISO was referred to as ASA. When you bought film that had a film speed of 100 or 200 or 400. This is your ISO in your digital camera.

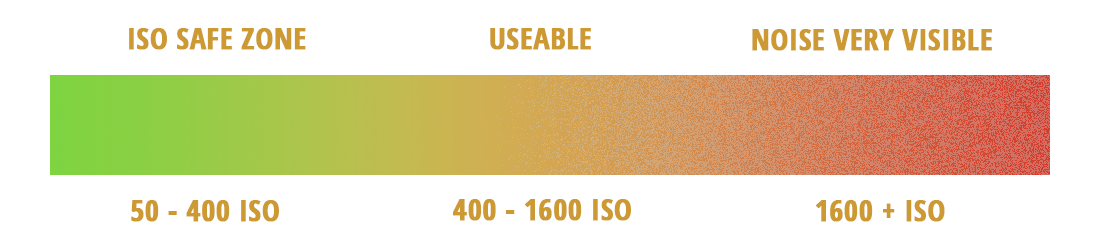
A cropped view of a Bondi aerial photo taken on the Canon 5D MKIII @ 3200iso. See how the digital noise in the image is evident and has caused the image to loose sharpness.
How does your ISO effect your exposure / photo ?
Now that we know what ISO is lets look at it in some more detail and context.
Your ISO setting will directly affect the shutter speed your camera will have. The lower the number 100 or “L” (50 iso) the less sensitive to light your camera is and this will reflect the shutter speed. Depending on the amount of light surrounding you / coming into the lens this could mean your shutter speed is too slow for you to hand hold your camera. The higher your ISO the more sensitive to light your camera is going to be, again this is subject to the light that is surrounding you (entering the lens of your camera). Unlike a low ISO your down side to this is subject to the camera model
The higher your ISO the more sensitive to light your camera is going to be, again this is subject to the light that is surrounding you (entering the lens of your camera). Unlike a low ISO your down side to this is subject to the camera model your using a high ISO can add unwanted digital noise (Film Grain) into your shot. So even if your image has been captured correctly and is nice and sharp because your ISO is too high the unwanted noise in your image can actually unsharpen your image. As Pictured above.
- Low ISO = Super Clean Image, Slower Shutter Speeds, Photos will show movement in them.
- High / Higher ISO = Noisy to Possibly Noisy Image, Fast Shutter Speeds, Photos will have no movement in them.
** Any movement in the image is always subject to how fast an object is moving.
What ISO and When ?
 Good question. The answer is “what do you want to achieve in your image”. If your tripod mounted and shooting in the morning and you want the water to have that beautiful movement look then your going to want to use a lower ISO as this will give you a slower shutter speed.
If your shooting during the day handheld your going to want to have a shutter speed that is fast enough to allow you to do this. For me personally, I will shoot at a shutter speed of at least 1/125th of a second at an ISO of 100 with an aperture of F11. If I wanted a faster shutter speed like 1/250th of a second which is double 1/125th then I would double my ISO to 200 to achieve this and to also maintain the same exposure. With my camera the Canon 5D Mark III I know 200 ISO is noise free so it is a safe zone.
The key to using the right ISO is finding a setting that will do the job without compromising the quality of your image, try not to over do the required ISO you need especially when your ISO starts entering the realm of adding digital noise to your image. But sometimes using a high ISO is required / unavoidable as you might be hand held shooting in low light, shooting fireworks, star trails, any number of situations. My only advice is to make sure your using the absolute highest ISO you need, as even a 1/3rd stop difference in ISO reduction can make a difference.
Field Test : Set your camera up on a tripod. Set your camera in AV mode. Point your camera at a scene can be anything. Now set your camera on it’s lowest ISO setting and take a shot. Note the shutter speed as well. Now take shots moving your ISO up until you hit your max ISO setting. As you get higher and higher you will see your shutter speed increase. If you go up in full stops you will see it double. At your highest ISO you will see on the screen of your camera the noise.
What’s the purpose to this test.
- To see what high and low ISO look like. So you know.
- To see how your shutter speed increases as well the more you make your camera sensitive to light.
- Most importantly of all… open the images in your chosen image software editor (Lightroom, Camera RAW etc) now look at your images closely you will see images that will have digital noise in them. Now what you need to determine and this will be subject to the camera make and model you have and what you deem acceptable… what ISO setting does your image look crap at. Once you know this then you now know not to go higher than the ISO you took that image at. If anything your going to want to shoot lower than that.
So if your shooting and get to that max ISO setting and need more light your going to have to find another way to get that shutter speed and it is going to have to come from your Aperture or shutter speed. The other two components of the exposure triangle.
Conclusion
The key to using your ISO correctly is finding the right ISO for what you want to achieve in your image and understanding how the ISO directly affects your shutter speed. ISO selection for shooting a landscape image in the morning is going to be different to the ISO you select for handheld shooting during the day or shooting surfers on a telephoto lens like the Canon 400mm f/5.6L lens or similar.
Because your ISO is all about the sensitivity of the light that is coming into your lens some settings in your camera will affect this. One setting is your Metering Mode. You will have usually four settings. Evaluative, Partial, Spot and Center-Weighted Average Metering. A quick look in your manual will explain these further but simply when you point your camera at a scene if you have it on spot meter your camera will read the light in that scene differently to you having it on Center-Weighted Average. The difference might not be much but it can also be a lot depending on what your camera is pointing at.
From this article, you should be able to answer the following.
- What is ISO and what does it do and what will it effect.
- How to adjust your ISO in your camera.
- After the Field Test you should know what the maximum ISO is on your camera that you would be happy using. Again this is subject to your camera make and model.


